
Imagine stepping into your backyard and being greeted by a stunning, shaded haven—a place where you can relax, host friends, or simply enjoy the outdoors in comfort. With a pergola with a roof, you can easily transform a plain patch of grass into an inviting, protected retreat. This project doesn’t just add beauty; it brings shade, rain protection, and even increases your home’s value. According to sources like HomeAdvisor, a well-crafted pergola can boost property value by 10-15%.
Why Build a Pergola with a Roof? Benefits and Inspirations
The Allure of a Pergola with Roof
A pergola with a roof is more than just an outdoor structure—it’s a lifestyle upgrade. Here’s why so many homeowners are choosing this feature for their backyards:
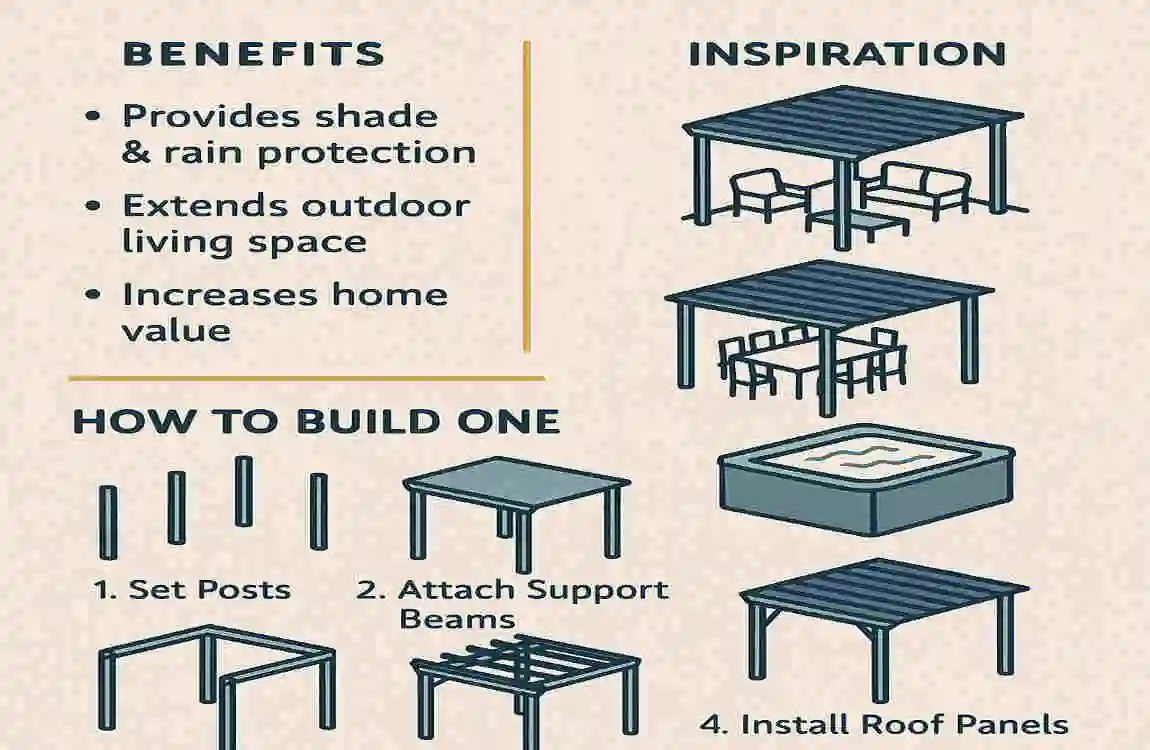
Top Benefits
- Year-Round Comfort: With a roof, your pergola offers reliable UV and rain protection, letting you enjoy the outdoors no matter the weather.
- Boosts Home Value: Studies show a quality pergola can raise your property’s curb appeal and resale value by up to 10–15%.
- Entertainment-Ready: Host BBQs, birthday parties, or quiet evenings under the stars—your pergola becomes the heart of backyard gatherings.
- Affordable DIY: Save thousands by building it yourself. DIY costs typically range from $500 to $2,000, whereas contractor-built pergolas can soar up to $10,000.
- Eco-Friendly Choices: Select retractable or solid roofs made from sustainable materials for an environmentally conscious upgrade.
Pergola Roof Ideas
Your choice of roof shapes the look and functionality of your pergola. Here are some popular options:
- Slatted Wood Roof: Allows partial sun and airflow—perfect for dappled shade.
- Retractable Fabric Canopy: Flexible coverage that you can pull back for sun or extend for shade and rain protection.
- Polycarbonate Panels: Lightweight, UV-blocking panels for full weatherproofing while letting light through.
- Living Roof: Train fast-growing vines or plants over the structure for a natural, cooling effect.
Planning Your Pergola: Design and Measurements
Before you break ground, planning is everything. Careful design ensures your DIY pergola plans with a roof fit your space, needs, and budget.
Choosing Size and Location
- Standard Sizes:
- 10×10 feet: Great for small yards or intimate seating.
- 12×16 feet: Ideal for larger gatherings, dining areas, or outdoor kitchens.
- Site Selection Tips:
- Find a spot that gets a desirable sun/shade balance.
- Leave at least 5-10 feet from your house for airflow and safety.
- Pick level ground to simplify construction and ensure stability.
Design Considerations
Here’s a quick table to help you weigh your options:
FeatureOptionsPros/Cons
Attached vs. Freestanding Wall-mounted or independent. Attached: Saves space, easy access; Freestanding: Flexible placement.
Roof Type: Open slats, solid, retractable. Slats: Airflow, partial shade; Solid: Full weather protection
Material Wood (cedar), vinyl, aluminum Wood: Warm, classic; Vinyl: Low-maintenance; Aluminium: Modern, durable
Permits and Budgeting:
- Permits: Always check your local zoning laws. Many areas allow up to 200 sq ft without a permit, but it’s smart to double-check.
- Budget: plan on $5–$15 per square foot. Materials for a 10×10 ft pergola typically range from $300–$1,500.
Materials and Tools Needed
Ready to gather supplies? Here’s everything you’ll need for a classic 10×10 ft backyard pergola build.
Essential Tools
- Power drill (with wood/metal bits)
- Circular saw (or mitre saw for clean cuts)
- Level (4 ft recommended)
- Post hole digger (manual or powered)
- Ladder (6–8 ft)
- Measuring tape
- Safety gear: Gloves, goggles, ear protection
Total estimated cost: $800–$1,200, depending on your material and roof choices.
Site Preparation: Foundation and Layout
A solid foundation is the secret to a long-lasting pergola. Here’s how to prep your site like a pro.
Mark Your Layout
- Use stakes and string to outline the pergola footprint.
- Ensure corners are square using the 3-4-5 rule (measure 3 ft on one side, 4 ft on the other, and adjust until the diagonal is exactly 5 ft).
Dig Post Holes
- Dig holes 24–36 inches deep (below the frost line for your climate).
- Space holes are precisely for proper alignment.
Prepare the Base
- Add 4–6 inches of gravel to each hole for drainage.
- Level the ground within the layout area.
Step-by-Step Guide: How to Build a Pergola with a Roof Frame
Let’s get hands-on! Follow these steps for a sturdy, beautiful pergola frame. (Keyword: how to build a pergola with a roof frame)
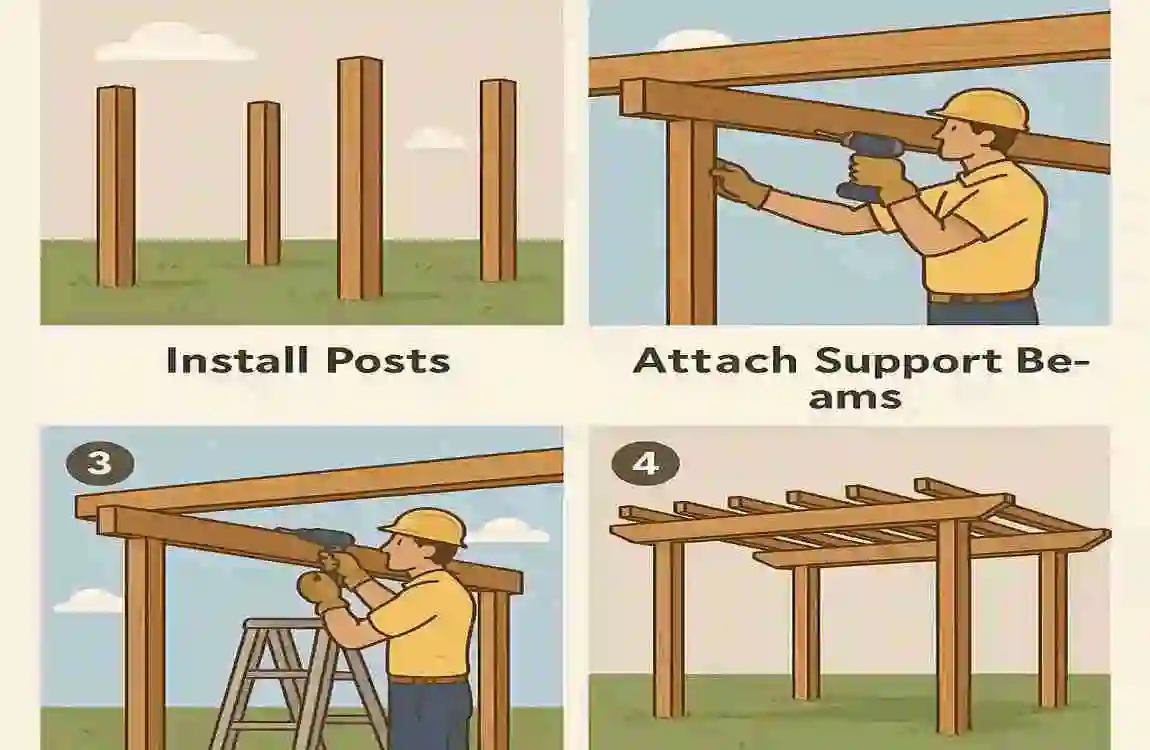
install Posts
- Place a 4×4 post in each hole, ensuring they stand perfectly upright (use a level).
- Pour concrete into holes, filling up to ground level.
- Brace posts with temporary supports to keep them plumb as the concrete cures.
- Let the concrete cure for 24–48 hours before moving on.
Attach Beams
- Notch the posts with a saw to receive horizontal beams (for extra stability).
- Lift 2×8 beams onto notched posts, running parallel on each side.
- Secure beams with galvanised brackets and lag screws.
- Check for level across the beam tops before tightening.
install Rafters
- Mark Rafter positions on top of beams, spacing them 12–16 inches apart.
- Notch rafters if needed for a flush fit.
- Lay rafters across beams and secure with screws or brackets.
- Add cross-bracing between rafters if your area is windy—this boosts strength and prevents wobble.
Frame Checks and Finishing
- Verify square and plumb: Measure diagonals and use a level for all vertical and horizontal members.
- Sand edges and corners to smooth rough spots and prevent splinters.
- Inspect for stability: Gently shake the frame—if anything moves, tighten bolts or add bracing.
Adding the Roof: Pergola Roof Installation
Now for the crowning touch—your pergola with roof DIY options.
Slatted Roof (Simple Shade)
- Cut 1×6 boards to the width of your pergola.
- Lay slats across rafters, spacing them 2–4 inches apart for dappled shade.
- Angle slats (optional) to block midday sun.
- Secure slats with rust-resistant screws.
Solid/Retractable Roof Options
TypeInstall StepsCost
Metal Panels Overlap and screw panels to rafters, seal edges $400
Fabric Canopy: Attach tracks/rails, slide canopy, motorise if desired $200
Polycarbonate Clip UV-coated sheets to rafters, caulk seams $300
Waterproofing Tips
- Caulk all seams where panels meet beams or rafters.
- Install gutters along the roof edges to direct rainwater away.
- Check roof slope: Even a slight incline (1–2°) helps water run off.
Finishing Touches, Maintenance, and Safety
Your pergola is built—now let’s make it shine and last for years.
Staining and Sealing
- Apply exterior-grade stain or sealant to all wood surfaces.
- Reapply every 1–2 years to protect from the sun and moisture.
Lighting and Decor
- String lights or lanterns for evening ambience.
- Add planters, outdoor curtains, or even a swing for extra charm.
- For privacy, consider lattice screens or climbing plants.
Safety Tips
- Anchor your pergola: Use hardware rated for 90 mph winds or higher.
- Avoid common mistakes: Use only pressure-treated or naturally rot-resistant wood. Don’t skimp on footings—deep, solid concrete is a must.
Enhancements to Transform Your Backyard
- Fire Pit: Add a safe, stylish fire pit nearby for year-round enjoyment.
- Seating: Built-in benches or weatherproof furniture make the space inviting.
- Smart Upgrades: Solar-powered lights, ceiling fans, or WiFi speakers for a modern touch.