
Imagine stepping into your bathroom for a relaxing shower, only to be greeted by those pesky white spots clinging to your tiles like uninvited guests. We’ve all been there. Those stubborn marks aren’t just dirt—they’re calcium deposits, the sneaky result of hard water doing its thing. If you’re tired of scrubbing endlessly and wondering how to remove calcium deposits from bathroom tiles without calling in the pros or using harsh chemicals, you’re in the right place.
What Are Calcium Deposits on Bathroom Tiles
Calcium deposits on bathroom tiles are those white, crusty spots that seem to appear out of nowhere. They’re basically mineral buildup from hard water. When water evaporates, it leaves behind calcium carbonate and other minerals, forming a hard layer called limescale.
Think of it like this: hard water is full of dissolved minerals. As the water dries on your tiles, those minerals crystallise and stick. Over time, they create a chalky film that’s tough to wipe away. This is especially common in bathrooms because of the constant moisture.
You’ll often spot them in grout lines, around faucets, or on shower walls. They’re not just ugly—they can make surfaces rough and uneven. If left unchecked, they might even harbour bacteria.
Why does this matter to you? Well, a clean tile surface means a healthier bathroom. Plus, removing them can restore that shiny, like-new look. Have you ever run your finger over a tile and felt that gritty texture? That’s limescale in action.
To visualise, picture a before-and-after: dingy tiles turning sparkling clean. It’s satisfying. Understanding this buildup is the first step to fighting it effectively. Let’s explore why it happens faster in some spots.
In simple terms, calcium buildup on bathroom tiles is explained: it’s nature’s way of leaving a mark. Hard water regions amplify the issue, but anyone can face it. Now, let’s see what speeds up this process.
Why Calcium Deposits Build Up Faster in Bathrooms
Bathrooms are like magnets for calcium deposits because of the perfect storm of conditions. High humidity keeps everything damp, and frequent water use means constant exposure to minerals.
Hard water is the big player here. If your area’s water has a high mineral content, deposits form more quickly. Regions like the Midwest and Southwest often experience this more, according to general water quality data.
Tile types matter too. Porcelain and ceramic are sturdy, but natural stone like marble can be more vulnerable because acids (used in cleaning) might etch them.
Humidity traps moisture, letting minerals settle longer. Poor ventilation worsens it—steam lingers, and deposits build.
A quick test: drip vinegar on a spot. If it fizzes, it’s likely calcium. Easy. Try it next time you’re in the bathroom.
Factors like temperature also play a role. Hot water evaporates faster, leaving more minerals behind. If you have a steamy shower habit, that could be contributing.
To give you a clearer picture, here’s a table showing average challenging water levels by U.S. region. This can help you gauge your risk.
RegionAvg. Hardness (ppm)Calcium Risk Level
Midwest 180-300 High
Southwest 200-400 Very High
Northeast 50-150 Medium
Southeast 100-250 High
West Coast 50-200 Medium to High
See where you fit? If you’re in a high-risk area, prevention becomes key. We’ll cover that later.
Signs Your Bathroom Tiles Have Calcium Deposits
Spotting calcium deposits early makes removal easier. Look for white, chalky spots or crusts that don’t wipe off with just water.
Another telltale sign is a rough texture on what should be smooth tiles. Run your hand over them—feel that grit?
Reduced water flow from faucets or showerheads? Buildup might be clogging things up inside.
Persistent dullness after cleaning is a red flag. If your tiles never shine like they used to, limescale could be the culprit.
- White, chalky spots or crusts that build up over time.
- Rough, uneven texture on tile surfaces.
- Slower water flow due to internal buildup.
- A dull, hazy appearance that resists regular cleaners.
Pro tip: Differentiate from soap scum by testing with vinegar. If it dissolves easily, it’s scum; if it’s abrasive and resists, it’s calcium. Noticing these in your space? Time to gear up.
Tools and Materials You’ll Need
Before you start removing calcium deposits, gather your toolkit. You don’t need fancy gadgets—most items are already in your home or easy to grab.
Start with white vinegar; it’s a natural acid that breaks down minerals. Baking soda adds gentle abrasion for scrubbing.
Lemon juice and salt work for lighter jobs, offering a fresh scent too.
You’ll want scrub brushes or sponges—soft ones to avoid scratches. Microfiber cloths are great for wiping without streaks.
Protective gear like gloves and goggles keeps you safe from splashes. Optional: a pumice stone for heavy buildup, but use it wet to prevent damage.
- White vinegar or a commercial cleaner like CLR.
- Baking soda and lemon juice for DIY pastes.
- Soft scrub brushes and microfiber cloths.
- Gloves and safety goggles for protection.
- Pumice stone or a Magic Eraser for tough spots.
Budget-wise, this is affordable. Check out this table for a quick breakdown.
ItemCostWhere to Buy
Distilled Vinegar $3 Grocery
Baking Soda $1 Grocery
Pumice Stone $5 Hardware Store
Scrub Brush $4 Discount Store
Microfiber Cloth $2 Home Goods
Safety first: always test on a small area. This kit sets you up for success. Got everything? Let’s move to the action.
Step-by-Step Guide: How to Remove Calcium Deposits from Bathroom Tiles
This is the heart of our guide on removing calcium deposits from bathroom tiles. We’ll break it down into methods, each with clear steps. Take your time—rushing can lead to mistakes.
Choose based on your buildup level. Natural methods are great for everyday use, while commercial ones handle the heavy stuff. Remember, patience is key; some deposits need time to soak.
Let’s start with the simplest: vinegar. It’s cheap, effective, and eco-friendly. Ready to try?
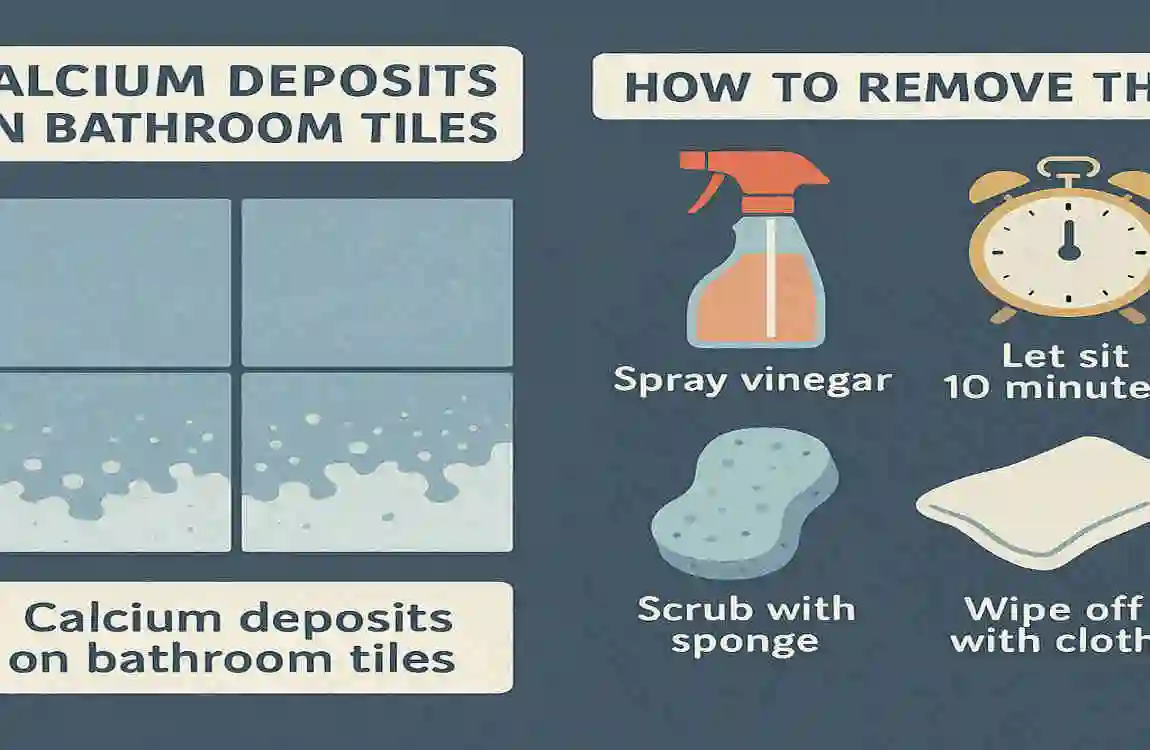
Vinegar Soak (Natural & Effective)
Vinegar is your go-to for removing calcium buildup on tiles. Acetic acid dissolves the minerals with little effort.
First, mix equal parts white vinegar and water in a spray bottle. Shake it well to combine.
Spray generously on the affected tiles. Let it sit for 30 to 60 minutes—longer for thick deposits. This soak time is crucial; it softens the limescale.
Next, grab a soft brush and scrub gently in circular motions. You’ll see the deposits loosening up.
Rinse with warm water and dry with a cloth. Voila—shiny tiles!
Why does this work? The acid reacts with calcium carbonate, breaking it down. It’s like chemistry in your bathroom.
For extra power, heat the vinegar slightly before mixing. But don’t boil it—safety first.
If you have colored grout, test first to avoid fading. I’ve used this on my own tiles, and it’s a game-changer. Give it a shot and see the difference.
What if the smell bothers you? It fades quickly, or add a drop of essential oil.
This method is perfect for regular maintenance. Moving on to something for stubborn spots.
Baking Soda Paste for Stubborn Spots
When vinegar alone isn’t enough, try a baking soda paste. It’s ideal for removing natural calcium in bathrooms.
Mix baking soda with a bit of vinegar to form a thick paste. The fizzing reaction helps lift deposits.
Apply the paste directly to the spots, focusing on grout lines where buildup tends to hide.
Let it sit for 15 minutes. This allows the paste to penetrate.
Scrub with a brush, using elbow grease for tough areas. Rinse thoroughly.
For grout, use an old toothbrush for precision. It gets into crevices without damage.
This combo is abrasive yet gentle—baking soda scrubs while vinegar dissolves.
I’ve tackled grout this way, and it restores that fresh look. Ever tried it? It’s satisfying to watch the grime vanish.
If deposits are extra hard, repeat the process. Don’t over-scrub; tiles can scratch.
Eco bonus: both ingredients are pantry staples—next, a fruity alternative.
Lemon Juice & Salt Abrasive
For a fresh, natural approach to cleaning limescale from tiles, use lemon juice and salt to shine.
Cut a lemon in half and sprinkle salt on the cut side. The salt adds grit for scrubbing.
Rub the lemon directly on the deposits, squeezing juice as you go.
Let it sit for 10 minutes to let the citric acid work its magic.
Scrub lightly with a sponge, then rinse. The salt helps remove residue.
This is great for light buildup and leaves a citrus scent.
Why effective? Citric acid dissolves calcium, similar to vinegar.
Use on non-porous tiles; avoid marble, as acids can etch it.
It’s fun and aromatic—try it on a sunny day for that extra zest.
If lemons aren’t handy, bottled juice works too. Now, for when DIY isn’t cutting it.
Commercial Removers When DIY Fails
Sometimes, you need stronger stuff for how to remove calcium deposits from bathroom tiles.
Products like CLR or Lime-A-Way are designed for this. They contain acids that zap limescale fast.
Follow the label: spray, wait the recommended time (usually 2-5 minutes), then scrub and rinse.
Pros: quick results. Cons: harsher chemicals, so ventilate well.
Compared to natural methods, it is faster but less eco-friendly.
Here’s a quick table of pros and cons.
ProductProsCons
CLR Fast-acting Strong odour
Lime-A-Way is effective on grout. May require gloves
Natural (Vinegar) Safe, cheap, takes longer
Choose based on your needs. Always wear gloves.
If you’re sensitive to smells, stick with DIY. For heavy jobs, these save time.
Pumice Stone for Heavy Buildup
For the toughest calcium buildup on tiles, a pumice stone is your friend.
Wet the stone and the tile first—this prevents scratches.
Gently rub in circles, applying light pressure. The porous stone grinds away deposits.
Rinse as you go to check progress. Stop when smooth.
Warnings: only on ceramic or porcelain; skip glass or delicate surfaces.
It’s manual but effective for old buildup.
I’ve used it on neglected tiles, and it revives them. Be patient—it’s worth it.
Post-method tips: always rinse well to avoid residue. Dry tiles completely to prevent new streaks. Snap before-and-after photos for motivation. You’ve got this!
Prevention Tips: Stop Calcium Buildup from Returning
Once you’ve removed those deposits, keep them away with smart habits. Prevention is easier than a cure.
Install a water softener if hard water is your issue. It reduces minerals at the source.
Daily squeegee after showers wipes away water before it evaporates.
Use hard-water stain-preventer sprays weekly—they create a barrier.
Regular monthly vinegar wipes keep surfaces clean with minimal effort.
- Install a water softener for long-term relief.
- Squeegee tiles after every use to remove water droplets.
- Apply preventive sprays to repel minerals.
- Wipe down with vinegar solution once a month.
- Improve ventilation with fans to reduce humidity.
Consider a whole-house filter. Pros: cleaner water everywhere. Cons: upfront cost.
Build a weekly routine: quick wipe-downs keep things spotless. What prevention hack will you try first?
Common Mistakes to Avoid When Cleaning Tiles
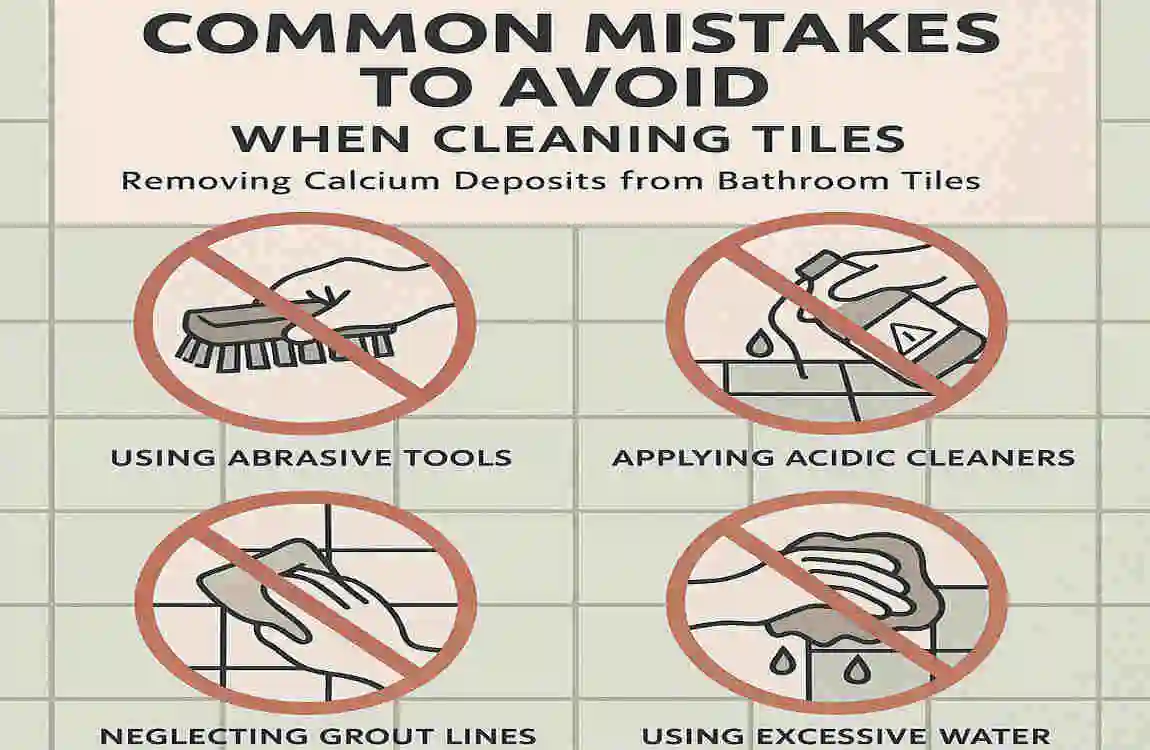
Cleaning tiles seems simple, but pitfalls abound. Avoid these to protect your bathroom.
- Using bleach—it can worsen deposits by reacting oddly with minerals.
- Grabbing abrasive pads on delicate tiles, they scratch surfaces.
- Skipping ventilation, leading to fume buildup.
- Not testing cleaners first, risking damage.
- Over-scrubbing wears down tile glaze.
For each, opt for alternatives: vinegar over bleach, soft cloths instead of pads.
Ventilate by opening windows. Always test small.