
Adding a dormer roof to your home is one of the most transformative renovations you can undertake. Not only does it enhance the aesthetics of your property, but it also creates additional usable space and floods your home with natural light. For anyone considering this exciting renovation, this comprehensive guide on how to build a dormer house roof will walk you through everything you need to know, from planning to execution and beyond.
What Is a Dormer Roof?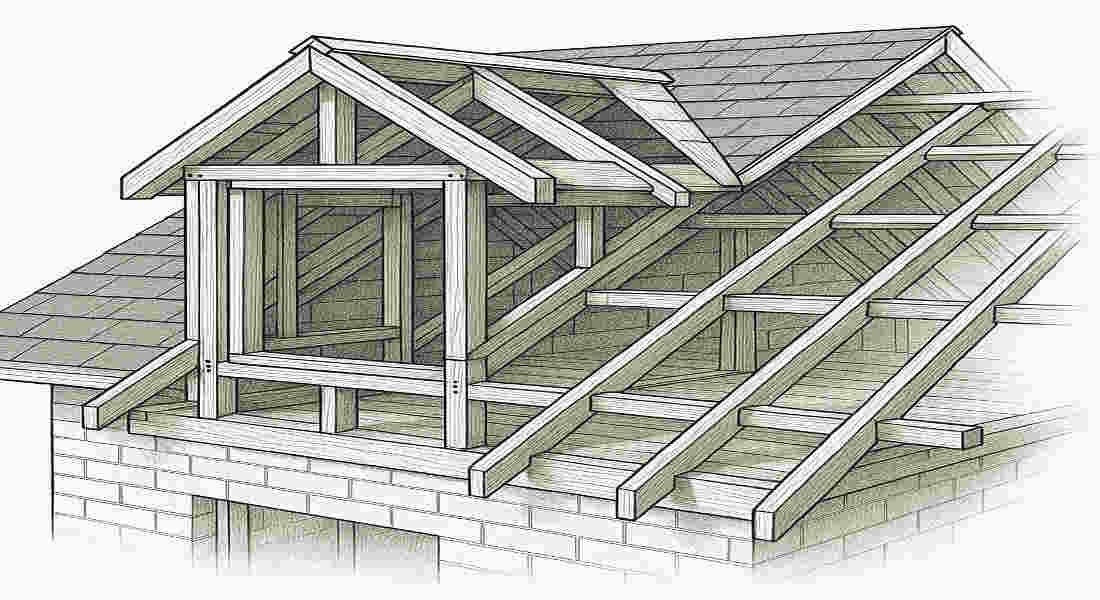
A dormer roof is a structural addition that projects vertically from a sloped ceiling. It typically includes a window, making it an elegant way to add light and space to an upper story. Dormer roofs are a popular choice in both traditional and modern architecture, offering a blend of functionality and style.
Why Are Dormer Roofs So Popular?
Dormers aren’t just about aesthetics—they’re a practical way to gain extra space without expanding the home’s footprint. They enable you to make better use of your attic or loft by converting it into a livable area. Additionally, dormers improve ventilation and bring in natural light, creating a bright and airy atmosphere.
In this article, we’ll explore how to build a dormer house roof, breaking it down into manageable steps so that you can plan this project confidently.
Understanding Dormer Roofs
Before diving into the construction process, it’s essential to understand the different types of dormers and their unique benefits. Each dormer style brings its architectural charm and functionality, so choosing the right one for your home is critical.
Types of Dormer Roofs
- Gable Dormer
- One of the most classic styles.
- It features a triangular shape with a peaked roof.
- Best for homes with pitched roofs.
- Shed Dormer
- It has a single-sloping roof that blends with the main roof.
- It provides more headspace, making it ideal for larger rooms.
- Flat Dormer
- Features a flat roof design.
- It is perfect for modern homes, offering a minimalist aesthetic.
- Eyebrow Dormer
- It has a curved, low-profile roof.
- Adds a softer, more decorative touch to the home.
- Hip Dormer
- Similar to a gable dormer but with three sloping sides.
- It provides better wind resistance.
Benefits of Dormer Roofs
- Increased Usable Space: Dormers turn an underutilized attic into a functional living space.
- Enhanced Natural Light: The addition of windows brightens interiors and reduces dependency on artificial lighting.
- Improved Ventilation: Fresh air can flow through the dormer windows, making the space more comfortable and inviting.
- Boosted Property Value: Dormer roofs elevate curb appeal and add value to your home.
Planning Your Dormer Roof Project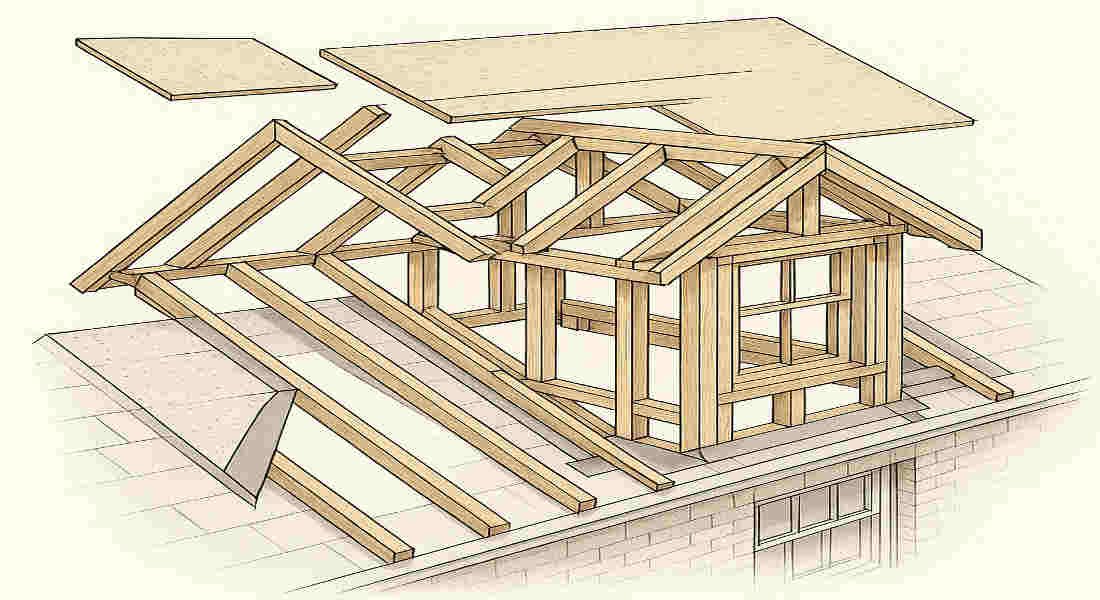
A successful dormer roof project starts with meticulous planning. From assessing your home’s structure to setting a realistic budget, every step matters.
You may also read (essential tips for cutting a metal roof at home).
Assessing Your Home’s Structure
Not all homes are suitable for dormer installations. You’ll need to:
- Inspect the attic space to ensure it can accommodate a dormer.
- Confirm that your roof’s pitch and existing structure can support the addition.
- Check for any obstructions, such as chimneys or vents that may interfere with construction.
Defining the Purpose
What will the dormer be used for? Common uses include:
- An extra bedroom or guestroom.
- A home office with plenty of natural light.
- A bathroom with added headroom for fixtures.
Clearly defining the purpose will help guide design decisions, such as window placement, size, and style.
Local Building Codes and Permits
Before starting construction, familiarize yourself with:
- Zoning laws in your area.
- Building codes govern structural safety and aesthetics.
- The need for permits, which may be required for major renovations, such as dormers.
Budgeting and Timeline
Building a dormer roof can be a significant investment. Key factors to consider include:
- Cost of materials (wood, insulation, roofing, etc.).
- Labor expenses if hiring professionals.
- The time required for construction can range from weeks to months.
DIY vs. Hiring Professionals
While some homeowners opt for DIY dormer construction, the process requires advanced carpentry and roofing skills. For most, hiring experienced contractors is the safest and most efficient option.
Step-by-Step Guide: How to Build a Dormer House Roof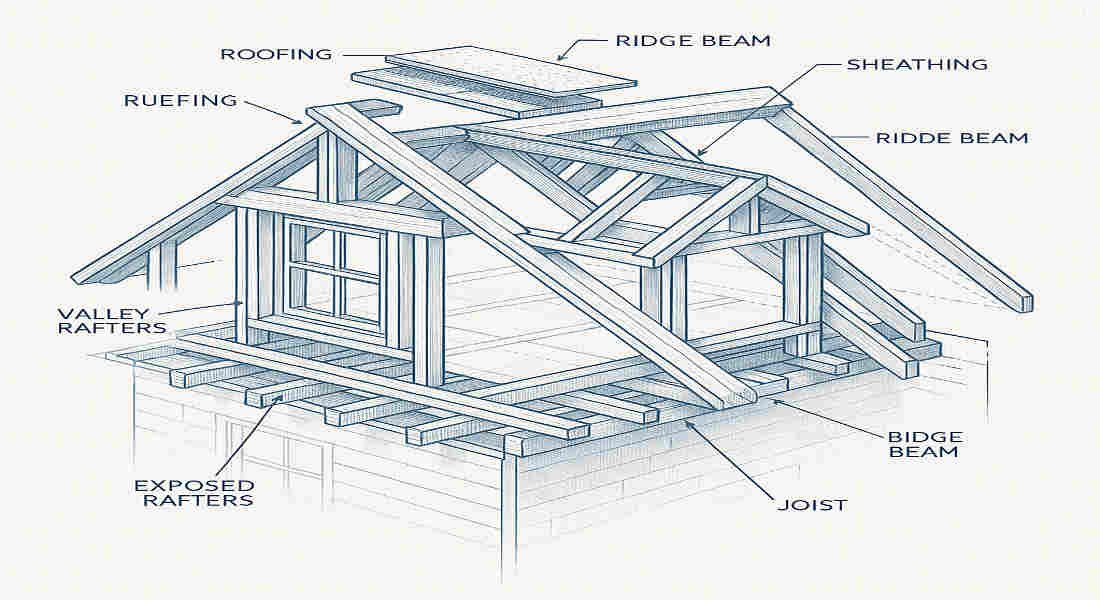
This section breaks down the construction process into four key stages. Each step is designed to simplify the process of building a dormer house roof.
Preparing the Roof and Framing
- Remove Roofing Materials:
- Identify the section where the dormer will be installed and remove shingles, tiles, or other roofing materials.
- Ensure proper safety measures, such as securing ladders and wearing protective gear, to prevent accidents and injuries.
- Build the Dormer Frames:
- Construct the dormer wall frames and cheek studs to support the structure.
- Install trimmers and support beams around the openings to ensure the area is structurally sound.
- Reinforce the Roof:
- Reinforce the surrounding roof to prevent sagging or instability once the dormer is added.
Constructing the Dormer Structure
- Frame the Dormer Walls and Roof:
- Use durable wood to frame the walls and roof of the dormer.
- Ensure all measurements align with your design plan.
- Add Sheathing and Weatherproofing:
- Attach plywood sheathing to the dormer frame.
- Add weatherproofing layers, such as roofing felt or flashing, to prevent water damage.
- Install Windows:
- Carefully fit dormer windows, ensuring a tight seal to keep out drafts and moisture.
You may also read (guide to managing citrus tree).
Roofing and Finishing Touches
- Install Roof Rafters and Ridge Boards:
- Securely attach rafters to support the dormer roof.
- Place ridge boards at the peak for additional stability.
- Apply Roofing Materials:
- Lay down roofing felt, followed by shingles or tiles that match the rest of your roof.
- Seal all joints to prevent leaks.
- Interior Work:
- Add insulation to keep the space energy-efficient.
- Install drywall, trim, and other finishing touches to complete the interior.
Safety and Technical Tips
- Always wear safety gear during construction.
- Use tools like a power saw, nail gun, and measuring tape for precision.
- Be prepared for challenges, such as weather delays or material shortages.
Pros and Cons of Building a Dormer Roof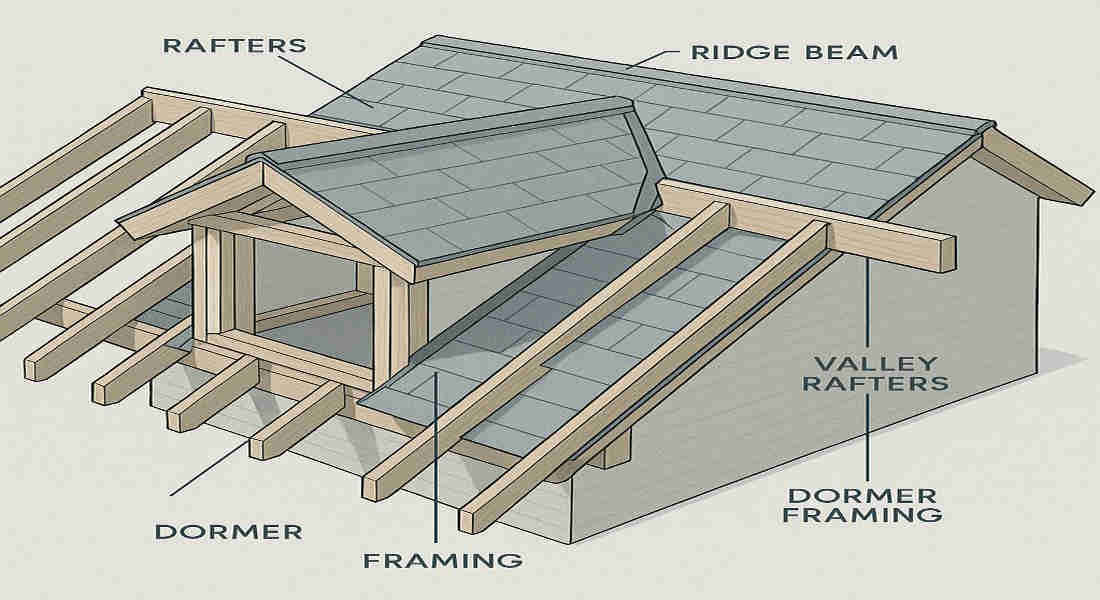
Advantages Potential Challenges
Adds space and natural light Requires structural modifications
Enhances home value Can be expensive
Improves ventilation May disrupt daily life during construction
Elevates curb appeal Risk of leaks if not built properly
Maintenance and Care for Dormer Roofs
To keep your dormer roof in excellent condition:
- Inspect for leaks and damage to flashing regularly.
- Check insulation for signs of moisture or mold.
- Clean debris from the roof seasonally to prevent clogs and maintain its integrity.
Inspiring Dormer Roof Design Ideas
- Combine gable dormers with large bay windows for a traditional look.
- Use shed dormers for a sleek, modern architectural style.
- Incorporate dormers into loft conversions to maximize space and light.
You may also read (guide to proper chimney height for your home).