
When it comes to working on your roof, safety should always be a top priority. Falls from roofs are one of the leading causes of injuries for homeowners and contractors alike. Whether cleaning gutters, repairing shingles, or installing solar panels, having a permanent roof anchor can significantly reduce the risk of accidents. But how exactly do you install one at home?
Understanding Permanent Roof Anchors
What is a Permanent Roof Anchor?
A permanent roof anchor is a safety device installed on your roof to provide an attachment point for fall protection gear, such as a safety harness. Once installed, it allows individuals to work safely at heights by securing them to the roof with a lanyard or rope.
There are several types of roof anchors:
- Fixed Roof Anchors: Installed permanently and remain in place for ongoing use.
- Removable or Temporary Anchors: These are used for short-term projects and removed afterward.
- Permanent Roof Anchors: Specifically designed to stay on the roof indefinitely, blending into the structure while ensuring safety.
Why Install a Permanent Roof Anchor at Home?
Installing a permanent roof anchor has several benefits:
- Enhanced Safety: Provides a secure point for fall protection, reducing the risk of accidents.
- Convenience: Ideal for routine maintenance tasks like cleaning gutters or inspecting your roof.
- Compliance: Many building codes and insurance policies require adequate safety measures for roof work.
- Versatility: Useful for homeowners, contractors, and anyone working at heights.
Planning Your Installation
Assessing Your Roof
Before installing a roof anchor, it’s essential to evaluate your roof’s type and structure:
- Roof Types: Asphalt shingle, metal, tile, flat, or pitched roofs require different installation approaches.
- Structural Considerations: Ensure your roof can handle the load-bearing capacity of the anchor. Locate rafters or trusses to provide the necessary support.
Choosing the Right Roof Anchor
Selecting the correct anchor for your roof is critical:
- Materials: Common materials include stainless steel, galvanized steel, or aluminum. Opt for durable, corrosion-resistant options.
- Compatibility: Ensure the anchor suits your roof type (e.g., pitched or flat).
- Certifications: Ensure compliance with OSHA (Occupational Safety and Health Administration) and ANSI (American National Standards Institute) standards.
Safety Precautions Before Starting
- Wear personal protective equipment (PPE), including a safety harness, gloves, and non-slip shoes.
- Avoid working during extreme weather conditions like rain or high winds.
- Ensure your ladder is secure and placed on a stable surface.
Tools and Materials Needed
Essential Tools
- Drill with appropriate bits
- Measuring tape
- Wrenches or socket set
- Marker or chalk
- Impact driver (optional but helpful)
Materials
- Roof anchor kit (usually includes the anchor and fasteners)
- Lag bolts or screws
- Sealant (to prevent water leaks)
- Flashing (for waterproofing)
Optional but Recommended
- Safety harness and lanyard
- Rope grab or lifeline
- Temporary roof anchor for additional safety during Installation
Step-by-Step Guide: How to Install Permanent Roof Anchor
Preparation
- Clear the work area and remove any debris from the roof.
- Gather all tools, materials, and safety equipment.
Locating the Installation Point
- Identify the rafters or trusses using a stud finder or inspecting the roof’s underside.
- Mark the location where the anchor will be installed. This should be near the peak of the roof for maximum stability.
Pre-Drilling and Positioning the Anchor
- Drill pilot holes at the marked locations to prevent splitting the wood.
- Position the anchor over the holes, ensuring it aligns with the roof’s pitch.
Securing the Anchor
- Use lag bolts or screws to fasten the anchor securely to the roof structure.
- Tighten all fasteners using a wrench or impact driver.
Sealing and Waterproofing
- Apply a generous amount of sealant around the anchor to prevent leaks.
- Install flashing over the anchor for added waterproofing.
Testing the Anchor
- Perform a load test to ensure the anchor can handle the required weight.
- Visually inspect the anchor for any loose bolts or gaps.
Clean Up and Final Safety Check
- Remove all tools and debris from the roof.
- Double-check all fastenings, seals, and the installation area.
Maintenance and Inspection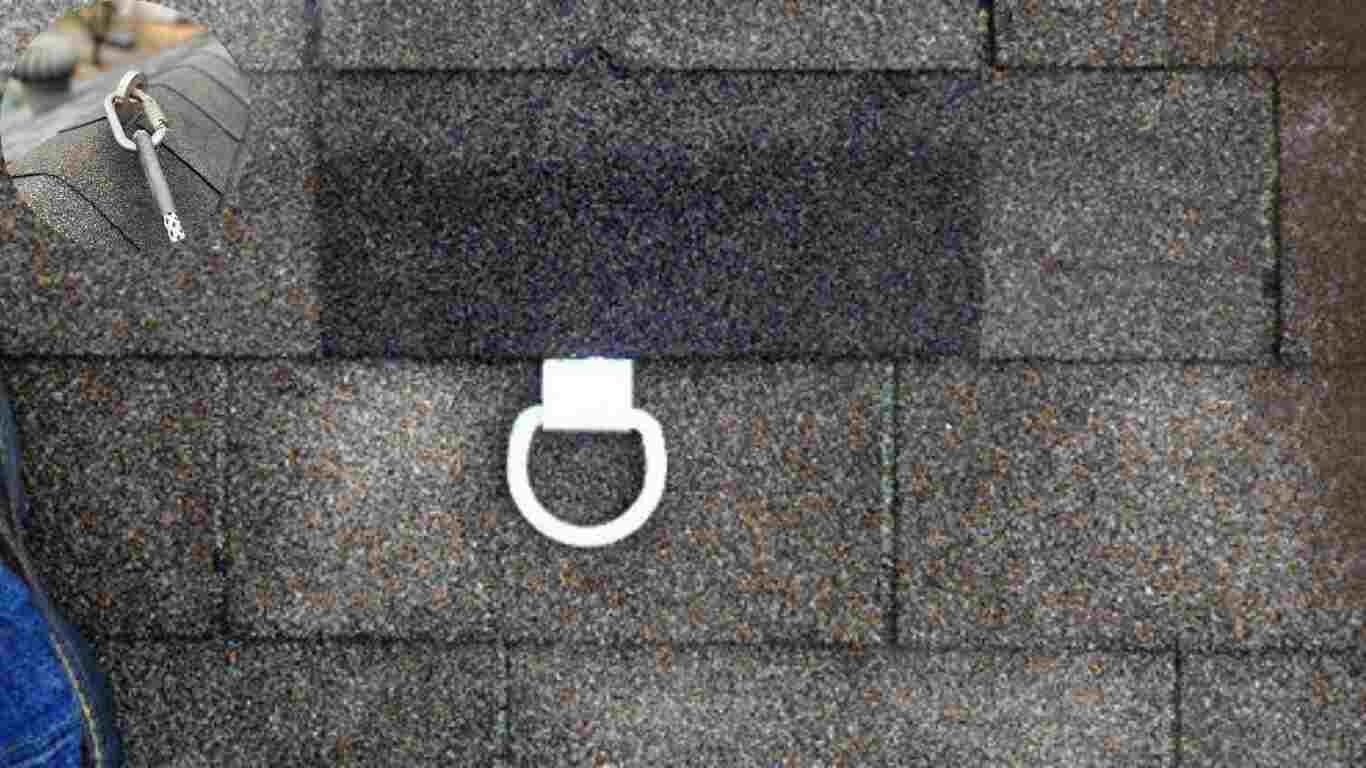
Routine Inspection Schedule
- Inspect your roof anchor at least twice yearly or before any major roof work.
- Look for signs of rust, wear, or damage to the anchor or fasteners.
Maintenance Tips
- Clean the anchor with a damp cloth to remove dirt and debris.
- Apply corrosion-resistant coating if needed.
- Replace worn or damaged parts immediately.
Common Mistakes to Avoid
- Installing the anchor on the wrong roof part (e.g., not on a rafter or truss).
- Using incompatible fasteners or materials.
- Skipping, sealing, and waterproofing steps.
- Ignoring manufacturer instructions for Installation.
- Failing to use proper safety gear during Installation.
Troubleshooting Installation Problems
ProblemCauseSolution
The anchor doesn’t sit flush. There are Misaligned pilot holes, Re-drill holes, or adjusted positions.
Leaks around the anchor Insufficient sealant or flashing Reapply sealant and install flashing.
Stripped screws/bolts Over-tightened fasteners Replace with new screws/bolts.
Frequently Asked Questions
Can I install a permanent roof anchor myself?
Yes, but only if you’re comfortable working at heights and have the proper tools and safety gear. Otherwise, hire a professional.
How much weight can a roof anchor hold?
Most anchors support up to 5,000 pounds, but check the manufacturer’s specifications.
Safety and Legal Considerations
- Ensure compliance with OSHA and ANSI standards.
- Check local building codes for any permit requirements.
- Consider liability and insurance implications when performing DIY installations.
Cost Breakdown and Budgeting Tips
ExpenseCost Range
Roof Anchor Kit $30–$100
Tools (if not owned) $50–$200
Professional Installation $200–$500
Additional Resources
- Manufacturer installation guides.
- Recommended safety equipment retailers.
- Related articles like “Top Roof Safety Tips” or “DIY Roof Maintenance.”
Conclusion
Installing a permanent roof anchor is a wise investment in your safety and the longevity of your home. By following these steps, you can ensure a secure and compliant installation. Remember, safety should always come first—don’t hesitate to seek professional help.
You may also read (homes with black- roofs)