
Is your RV bathroom faucet dripping, sputtering, or just looking a little worse for wear? You’re not alone. Many RVers have faced the frustration of a leaky or outdated faucet, especially during those moments when comfort matters most—like prepping for a big day of sightseeing or winding down from a long drive.
If you’re wondering how to replace an RV bathroom sink faucet without calling a professional, you’re in the right place! This guide will walk you through a simple, step-by-step process to replace your old faucet with a new, efficient, and stylish model—no plumbing license required. Not only will you save an average of $200+ on plumber fees (according to national averages), but you’ll also enjoy a faucet that feels just like home, with better water flow and modern features.

Common Problems with RV Faucets
Many RVers encounter faucet issues at some point. RV sink faucets tend to wear out faster than home models due to constant vibration, limited water pressure, and exposure to mineral-laden water. The most frequent complaints include:
- Low Water Pressure: Mineral buildup or corroded parts often lead to weak flow.
- Leaky Seals: Worn gaskets or connections can leave you with a soggy cabinet.
- Outdated Designs: Old faucets may lack features like pull-down sprayers or easy-turn handles, making daily use less comfortable.
Benefits of Upgrading Your Faucet
So, why bother with a replacement? The rewards are bigger than you might think:
- Improved Water Efficiency: Modern RV faucets use up to 20% less water, stretching your fresh tank further.
- Enhanced Style: A new faucet can instantly refresh your bathroom, bumping up resale value by 5-10%.
- Better Functionality: Smoother handles and improved aerators mean a more enjoyable experience.
When to DIY vs. Call a Pro
If your faucet swap takes less than 2 hours and there’s no significant pipe damage, you can safely handle this project yourself. However, if you spot significant leaks behind walls or under the floor, it’s best to call in a pro.
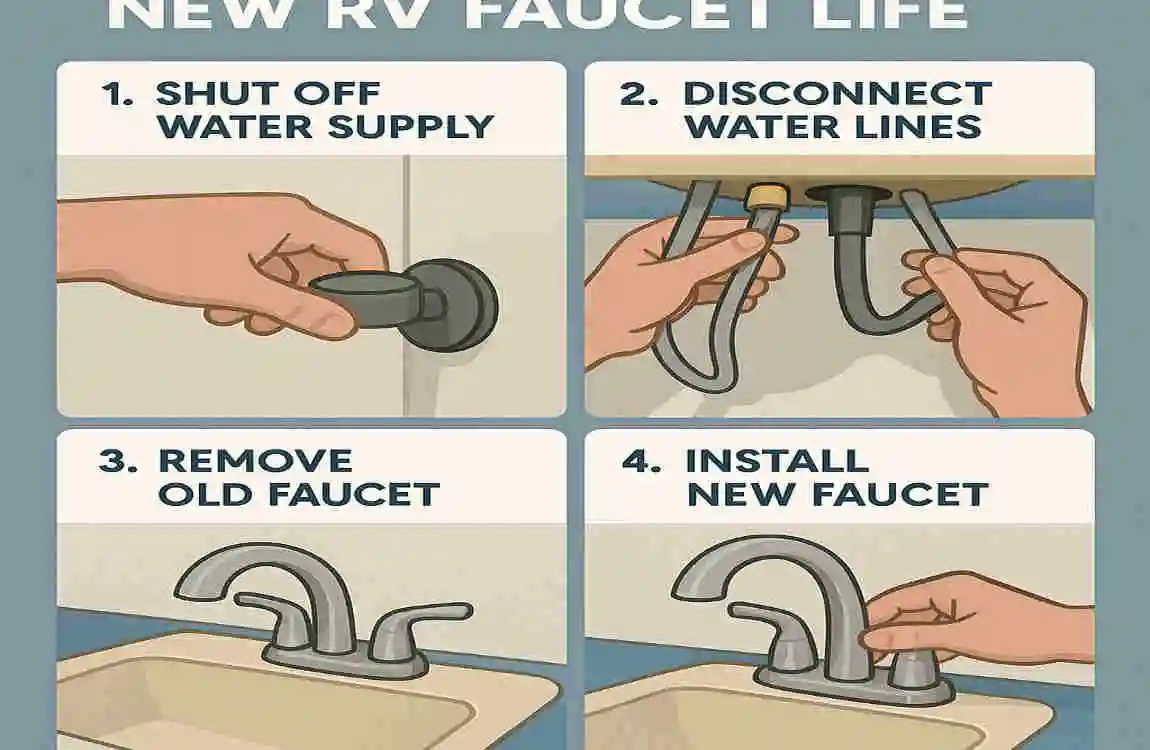
Infographic:
- Persistent drips
- Cracked finish
- Rust around the base
- Handles hard to turn
Tools and Materials Needed for RV Sink Faucet Replacement
Before you dive in, gather everything you’ll need for a smooth, stress-free install. Here’s a quick reference table for your toolkit:
Tools: Adjustable wrench, pliers, screwdriver set, bucket, flashlight, Pipe cutter, plumber’s putty knife
Materials: New RV-compatible faucet (e.g., Dometic, Furrion), Teflon tape, silicone sealant, Flexible supply lines, shutoff valves
Safety Gloves, eye protection, and Towels for spills
Cost Breakdown
- Typical Cost Range: $50–$150 for all supplies.
- Savings vs. Plumber: DIY can save you up to $250!
Pro Tips for Choosing the Right Faucet
- Select Lead-Free, Low-Arc Models: These fit best in tight RV spaces and meet safety standards.
Preparation: Safety First Before Replacing the RV Faucet
Before you start unscrewing anything, take these smart safety steps:
Step-by-Step Prep Checklist
- Park Level & Turn Off Propane: Ensure your RV is stable and safe.
- Locate and Shut Off Water: Turn off the main pump or hook-up valves.
- Drain Water Lines: Open faucets to release pressure and remaining water.
- Unplug Nearby Outlets: Water and electricity don’t mix!
- Protect Your Work Area: Lay down towels to catch drips.
Step-by-Step Guide: How to Replace an RV Bathroom Sink Faucet
Let’s roll up our sleeves! Here’s your foolproof method for a DIY RV sink faucet install. Feel free to bookmark this page or print it out for your next trip.
Remove the Old Faucet
- Clear the Area: Take out personal items and protect the countertop with a towel.
- Disconnect Water Supply Lines: Use an adjustable wrench to loosen the nuts. Place a bucket below to catch any drips.
- Unscrew the Mounting Nuts: Under the sink, use your pliers or wrench. If space is tight (as it usually is in RVs), try a basin wrench for extra reach.
- Lift Out the Faucet: Gently remove the old unit.
Clean and Prep the Sink Area
- Remove Old Sealant: Scrape off any old plumber’s putty or silicone with a putty knife.
- Wipe Down the Surface: Clean with a mild detergent to remove residue and ensure a good seal.
- Inspect the Hole: Check for cracks or rust. Most RV sink openings are 1.5–2 inches wide.
install the New Faucet
- Insert the Faucet: Place the new faucet through the sink hole. Align the gasket or escutcheon plate (the decorative cover) as needed.
- Secure Underneath: From below, screw on the mounting nuts. Hand-tighten, then snug up with a wrench—don’t overtighten.
- Connect Water Lines: Attach hot and cold supply hoses to the correct posts. Most are colour-coded (red for hot, blue for freezing).
- Seal the Threads: Wrap Teflon tape around the threads to prevent leaks.
- Variations:
- Single-Handle Faucets: Often easier to install in tight RV sinks.
- Widespread Faucets: May require drilling an extra hole; check your sink first.
Test and Seal for Leaks
- Turn Water On Slowly: Open the main valve and pump. Let water flow gently.
- Check for Drips: Inspect all connections and the base of the faucet.
- Tighten If Needed: Use your wrench to snug any loose connections lightly.
- Seal the Base: Apply a thin bead of silicone caulk around the faucet base for extra protection. Let it dry per the instructions.
Troubleshooting Table
IssueFix
Low-flow Clean aerator
Leaks at base: Reapply sealant
No hot water. Check the heater bypass valve.
Step 5: Final Touches for House-Like Comfort
- Polish Chrome or Stainless Surfaces: Use a soft cloth for a sparkling finish.
- Install Accessories: Consider adding an RV-friendly soap dispenser or water filter.
- Time Estimate: For first-timers, expect 45–90 minutes start to finish.
Common Mistakes to Avoid When Replacing an RV Bathroom Sink Faucet
Even seasoned DIYers can trip up on these classic pitfalls:
- Forgetting to Shut Off the Water: This can lead to floods—always double-check!
- Buying the Wrong Faucet Size: Measure your sink holes first to avoid returns.
- Overtightening Connections: This can crack delicate RV sink or thread fittings.
- Ignoring Leaks: Always test with water before calling it done.
- Using the Wrong Sealant: Not all caulks are rated for constant moisture.
Top RV Faucet Recommendations for
Ready for an upgrade? Here are some of the best picks this year:
ModelPriceFlow RateWarrantyFeatures
Valterra $40 1.8 GPM 1 year Compact, easy swap
Moen RV $80 2.0 GPM 5 years Touchless, Premium
Dura Faucet $55 1.5 GPM 2 years Vibration resistant
Choosing Factors:
- Vibration Resistance: Essential for bumpy roads.
- Easy Installation: Look for tool-free supply line connections.
Keep your faucet running like new with these simple habits:
- Monthly Descaling: Run a vinegar solution through to prevent mineral buildup.
- Winterise Properly: Drain all water from the system before storage to avoid freeze damage.
- Clean Aerators Regularly: Unscrew and rinse to maintain good flow.