When it comes to home safety, comfort, and efficiency, the role of a properly constructed chimney is often overlooked. However, ensuring your chimney is at the correct height is essential for effective ventilation, smoke clearance, and fire safety. Whether you’re a homeowner looking to install a new chimney or make improvements to an existing one, understanding chimney height requirements is crucial.
Why Chimney Height Matters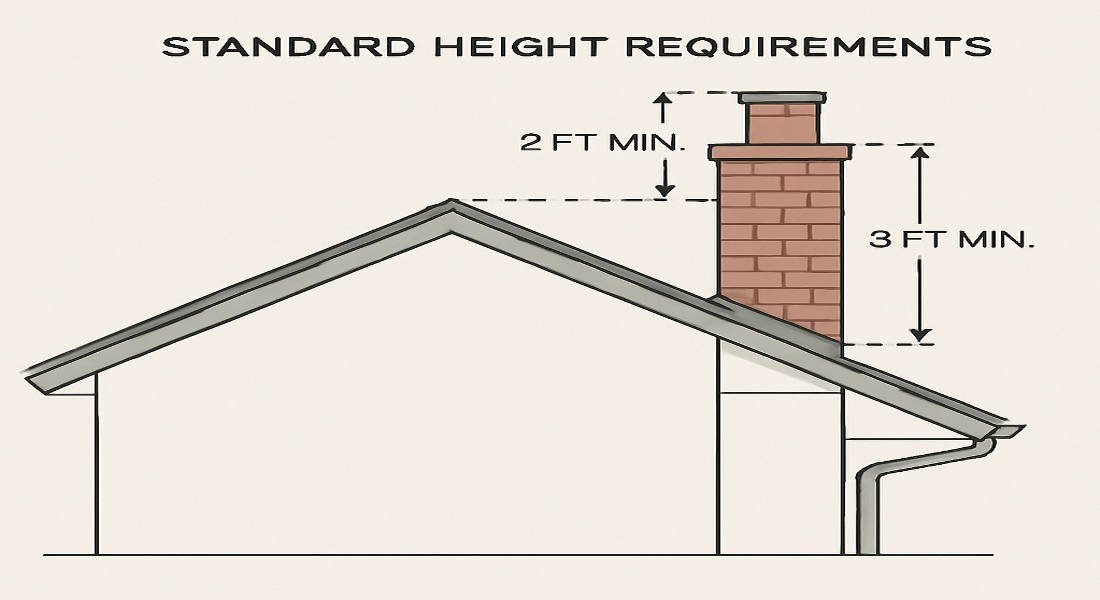
If you’ve ever dealt with smoke backing up into your home or a fireplace that doesn’t seem to heat efficiently, the culprit could be your chimney’s height. A properly sized chimney ensures optimal draft, which is the upward movement of air and gases out of your home. This draft is crucial for safely and efficiently removing smoke, carbon monoxide, and other combustion byproducts.
But what happens if the chimney is too short or improperly placed? Poor ventilation can cause smoke buildup, reduce heating efficiency, and even pose a fire hazard. These issues make understanding and adhering to the correct chimney height a top priority for any homeowner.
Understanding Chimney Height Basics
What Is Chimney Height?
Chimney height refers to the distance from the base of the chimney to its top. It plays a critical role in ensuring proper airflow and ventilation. The height affects the chimney’s ability to create a strong draft, which pulls smoke and gases out of your home while letting fresh air flow into your fireplace or heating system.
You may also read (essential tips for cutting a metal roof at home).
The 3-2-10 Rule
The 3-2-10 rule is a widely recognized standard for chimney height. Here’s how it works:
- The chimney must extend at least 3 feet above the roof penetration (where it exits the roof).
- It must be at least 2 feet taller than any structure within a 10-foot radius horizontally.
This rule ensures that the chimney is high enough to prevent interference from nearby structures like your roof, trees, or other obstacles. It also helps to maintain proper airflow and avoid downdrafts (when wind pushes smoke back down into your home).
Factors to Consider
- Roof Pitch: A steeply sloped roof might require a taller chimney to meet the 3-2-10 rule.
- Nearby Structures: Trees, antennas, or even garden features close to the chimney can affect airflow.
- Wind Zones: Strong winds can create downdrafts if the chimney isn’t tall enough to disperse smoke effectively.
By adhering to these principles, you can avoid common problems like poor drafts, smoky interiors, or even chimney fires.
How to Calculate the Proper Chimney Height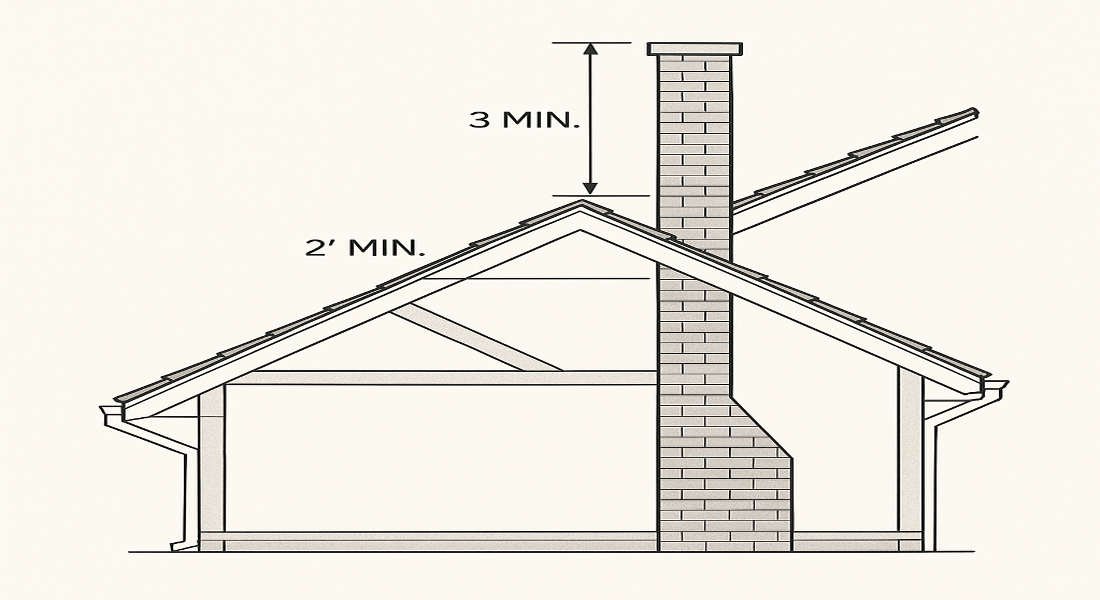
Measure Your Roof Pitch
Before calculating chimney height, you need to understand your roof’s pitch. Roof pitch is defined as the angle or steepness of your roof and is measured as the rise (vertical height) over the run (horizontal distance).
Tools You’ll Need:
- A tape measure
- A level
- A measuring square or smartphone app
How to Measure:
- Place the level horizontally on your roof.
- Measure the vertical rise from the level to the roof surface over a 12-inch run.
- Record the measurement as a ratio (e.g., 4:12 or 6:12).
Determine the Chimney’s Clearance
Using the 3-2-10 rule, calculate the required height of your chimney:
- Measure the horizontal distance from the chimney to the nearest structure (e.g., a roof ridge, tree, or wall).
- Ensure the chimney is at least 2 feet taller than anything within 10 feet horizontally.
Example Calculations:
- Chimney More Than 10 Feet from Ridge: If the chimney is far from the ridge, use the basic 3-foot minimum height above the roofline.
- Chimney Less Than 10 Feet from Ridge: Add 2 feet of height above the highest point within 10 feet.
Finalize the Height
Once you’ve calculated the minimum height, verify that it complies with local building codes. These codes may have additional requirements depending on your region’s climate, wind conditions, or safety regulations.
Regulatory and Safety Standards for Chimney Height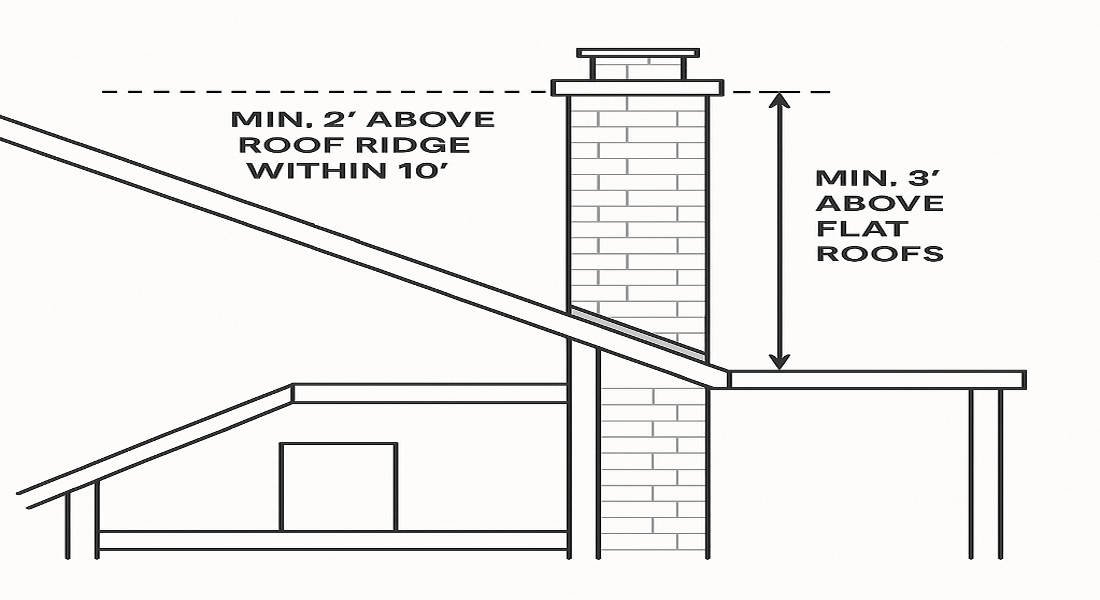
Building Codes
Most building codes follow the 3-2-10 rule but may have additional stipulations based on local conditions. For example:
You may also read (can plumbing work without electricity in your home).
- Areas prone to heavy snowfall might require taller chimneys to prevent blockages.
- Windy regions may mandate additional bracing or height adjustments.
Safety Concerns
Improper chimney height can lead to serious safety risks, including:
- Fire Hazards: Inadequate clearance can cause heat or sparks to ignite nearby materials.
- Carbon Monoxide Poisoning: Poor ventilation allows harmful gases to accumulate indoors.
- Structural Damage: Short chimneys are more susceptible to downdrafts and weather-related wear.
To ensure compliance, consult with a licensed contractor or building inspector. Regular inspections can also help identify potential problems before they escalate.
Practical Tips for Chimney Installation and Maintenance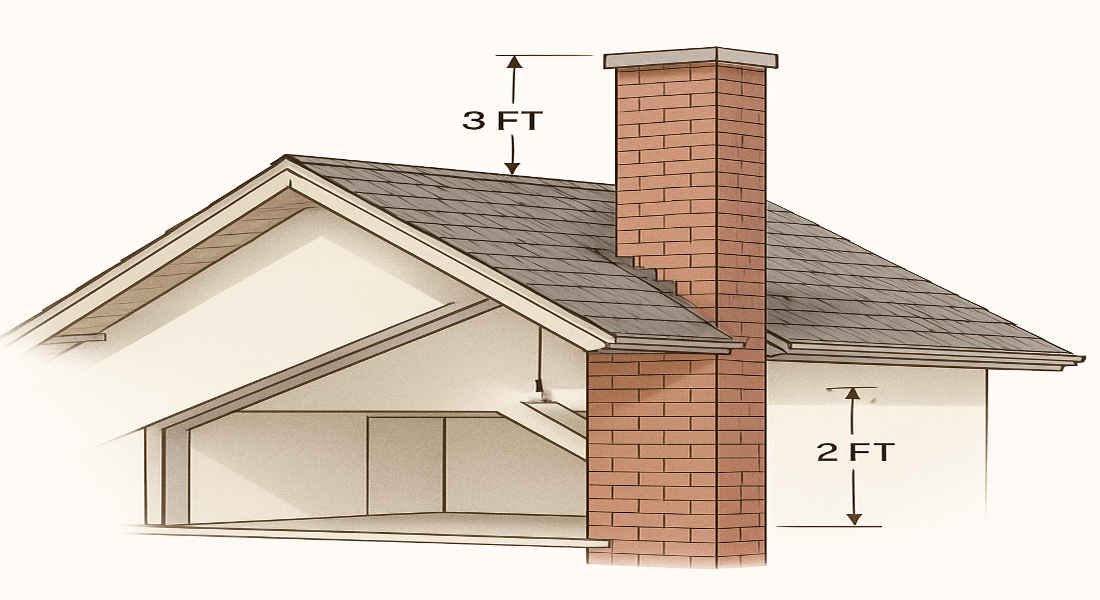
Choosing the Right Materials
Select chimney pipes and materials that are durable and weather-resistant. Stainless steel and clay flue liners are popular choices for their longevity and heat resistance.
Installation Tips
- Use a chimney cap to prevent debris, rain, and animals from entering.
- Ensure the chimney is securely attached to your roof to withstand strong winds.
- Seal all joints properly to avoid leaks or drafts.
Routine Maintenance
- Schedule annual chimney inspections.
- Clean the flue regularly to remove creosote buildup.
- Check for cracks, loose bricks, or rusted components.
By maintaining your chimney, you’ll not only prolong its lifespan but also improve its efficiency and safety.
Integrating Home Improvement: Leveling a Garden with Sleepers Near Your Chimney
While chimneys are essential for indoor comfort, the area around your home, including your garden, also plays a role in maintaining structural safety. Levelling a garden with sleepers is a practical way to enhance landscaping near your chimney or outdoor fireplace.
Why Level Your Garden?
An uneven garden can cause water to pool near your chimney’s base, leading to foundation damage and moisture problems. Proper levelling with sleepers creates a stable, attractive surface that complements your chimney and the exterior of your home.
Step-by-Step Guide
- Choose Your Sleepers: Opt for treated timber sleepers for durability and resistance to weather.
- Prepare the Ground: Clear debris and dig out any high spots. Use a spirit level to ensure the ground is even.
- Install the Sleepers: Lay sleepers in the desired layout, securing them with stakes or screws.
- Fill and Level: Backfill with soil or gravel to create a smooth, level surface.
By combining chimney safety with smart landscaping, you can create a more cohesive and functional outdoor space.
Common Mistakes to Avoid
Key Errors to Watch Out For:
- Misjudging roof pitch or clearance requirements.
- Ignoring nearby obstacles like trees or antennas.
- Skipping professional inspections.
- Overlooking local building codes.
Avoid these pitfalls to ensure your chimney functions efficiently and safely.
You may also read (painting your aluminum roof explained).