
Installing a roof vent for your range hood is essential to ensure proper kitchen ventilation. Not only does this improve air quality and remove odors, but it also enhances the safety and value of your home.
Why Proper Kitchen Ventilation Matters
When cooking, your range hood works hard to remove grease, smoke, steam, and odors from the air. Without proper ventilation, these byproducts can accumulate in your kitchen, leading to poor air quality, moisture buildup, and even long-term damage to your home.
Installing a roof vent ensures that all the pollutants captured by your range hood are expelled outside, creating a healthier and safer indoor environment. A well-ventilated kitchen enhances your home’s value, making it more appealing to future buyers.
Understanding Roof Vents for Range Hoods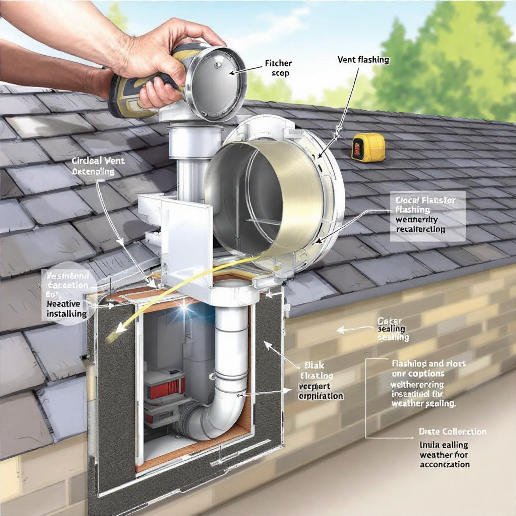
What is a Roof Vent for a Range Hood?
A roof vent for a range hood is a specialized venting system designed to expel air, moisture, and cooking byproducts from your kitchen to the outdoors. Unlike wall vents, which release air through your home’s exterior walls, roof vents direct airflow vertically through the ceiling and roof.
Why choose roof venting? Roof vents are often preferred in kitchens because they:
- Provide a direct and efficient path for airflow.
- Minimize bends in ductwork, which can restrict ventilation.
- Suit homes with limited wall space or exterior obstructions.
Benefits of Installing a Roof Vent
Adding a roof vent for your range hood offers multiple advantages:
- Improved Air Quality: Removes smoke, grease, and pollutants from your kitchen.
- Moisture Removal: Prevents mold and mildew caused by excess humidity.
- Enhanced Comfort: This keeps your kitchen cooler and more enjoyable to cook in.
- Energy Efficiency: Reduces strain on your HVAC system by expelling hot air.
- Increased Home Longevity: Prevents long-term damage to walls, ceilings, and cabinetry.
Planning Your Roof Vent Installation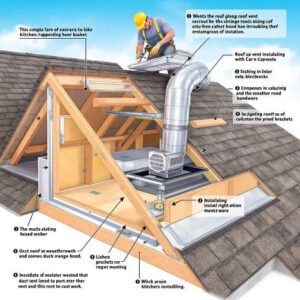
Is Roof Venting Right for Your Home?
Before starting the installation, ask yourself these questions:
You may also read (how long should a roof)
- Do you have roof access? Homes with steep roofs or limited attic space may require professional help.
- What are the local building codes? Some areas have specific ventilation requirements.
- Are you comfortable with DIY work? While many homeowners can install a roof vent, knowing your limits is essential.
Hiring a professional can save time and ensure compliance with regulations if the project feels overwhelming.
Tools and Materials Checklist
Here’s what you’ll need for the job:
Tools:
- Drill and drill bits
- Drywall saw or jigsaw
- Measuring tape
- Ladder and safety harness
- Stud finder
- Screwdriver
Materials:
- Roof vent cap
- Ductwork (rigid metal is recommended)
- Flashing
- HVAC tape
- Roofing sealant or silicone caulk
Safety Gear:
- Gloves
- Safety goggles
- Dust mask
Having everything ready before you start will save you time and ensure a smoother process.
Preparation Steps Before Installation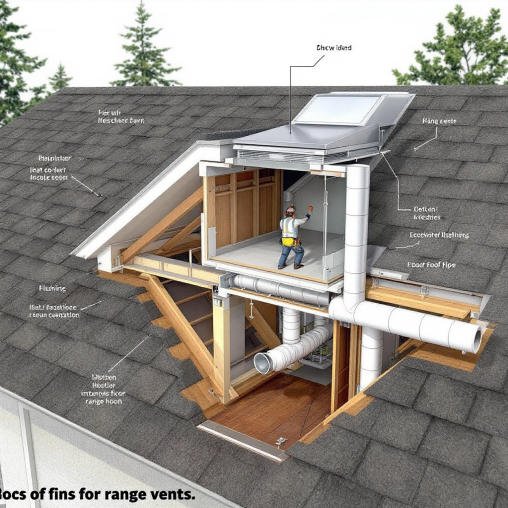
Site Assessment and Measurements
Choosing the correct location for your vent is critical. Ideally, the vent should be directly above your range hood to minimize duct length and maximize airflow.
- Measure the distance: Check the distance between your range hood and the roof to determine the length of ductwork needed.
- Mark the centerline: Use a stud finder to locate joists and mark the centerline for the vent hole on your ceiling and roof.
- Avoid obstructions: Inspect the attic and roof space for any wiring, plumbing, or HVAC components that could interfere with installation.
Ventilation Requirements and Best Practices
- Duct Size: Use a duct size recommended by your range hood manufacturer (commonly 6-8 inches in diameter).
- Material: Select rigid metal ducting for durability and better airflow. Avoid flexible plastic ducts, as they can sag and trap grease.
- Minimize Bends: Keep ductwork straight and limit the use of elbows to ensure efficient ventilation.
Step-by-Step Guide: How to Install House Roof Vent for Range Hood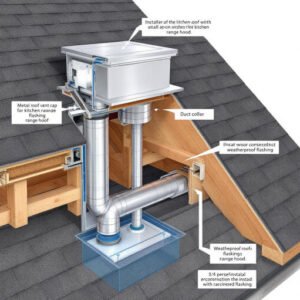
Preparing the Range Hood and Work Area
- Unbox your range hood and inspect it for any damage.
- Ensure all parts, including screws and mounting brackets, are included.
- Protect your countertops and floors with a drop cloth to prevent damage during installation.
Marking and Cutting the Ceiling and Roof
- Mark the vent hole: Using your measurements, mark the spot where the vent will pass through the ceiling and roof.
- Drill a pilot hole: Drill a small hole through the marked spot to locate it from the roof’s exterior.
- Cut the openings: Use a drywall saw to cut the ceiling hole and a jigsaw or reciprocating saw to cut the roof opening.
Safety Tip: Wear a safety harness when working on the roof and avoid working during wet or windy weather.
Installing the Roof Cap and Flashing
- Place the roof cap over the opening and secure it with screws.
- Install flashing around the base of the roof cap to prevent water leaks.
- Seal the edges with roofing tar or silicone caulk for added weatherproofing.
Running the Ductwork
- Measure and cut rigid duct sections to fit between the range hood and roof cap.
- Secure the ductwork using metal hanger straps and seal the joints with HVAC tape.
- Ensure the duct is straight and properly aligned to avoid airflow issues.
Mounting the Range Hood
- Align the range hood with the pre-marked mounting points.
- Secure it to wall studs or the underside of a cabinet using screws.
- Connect the electrical wiring, ensuring the power is turned off before starting.
Final Sealing and Inspection
- Check all seals and flashing to ensure they are weatherproof.
- Inspect the ductwork for any kinks or loose connections.
- Test the range hood to verify proper airflow and functionality.
Troubleshooting Common Installation Issues
IssueCauseSolution
Leaks around roof cap Inadequate sealing Reapply roofing tar or silicone caulk.
Insufficient airflow Blocked or kinked ductwork Inspect and straighten ducts.
Excessive noise Loose mounting or poorly aligned duct Tighten screws and adjust ductwork.
Electrical problems Faulty wiring Turn off power and recheck connections.
Maintenance Tips for Your Roof Vent and Range Hood
To keep your roof vent and range hood functioning efficiently:
- Clean filters regularly: Grease buildup can restrict airflow.
- Inspect the roof vent cap: Remove debris, nests, or blockages from the cap.
- Check ductwork annually: Look for leaks or buildup inside the ducts.
- Schedule professional inspections: An annual checkup ensures optimal performance.
You may also read (paint a shingle house roof)