
Have you ever walked into your bedroom after a long, exhausting day, only to feel completely uninspired by the blank, boring space staring back at you? We have all been there. You want to transform your bland bedroom into a dreamy, relaxing retreat, but when you look at the price tags on custom furniture, your heart sinks. You need a solution that looks incredibly expensive without actually breaking the bank
If you have scrolled through TikTok or Instagram recently, you have absolutely seen this viral DIY hack exploding across your feed. Influencers like @cozybedroomvibes are ditching traditional, clunky bed frames for sleek, glowing, custom-built focal points. This project is taking the internet by storm because it instantly infuses any sleeping space with cosy, customizable vibes.
The numbers speak for themselves. This year alone, Pinterest reported a massive 150% rise in searches for “LED headboard DIY” projects. People are craving personalised sanctuaries, and this project delivers exactly that.
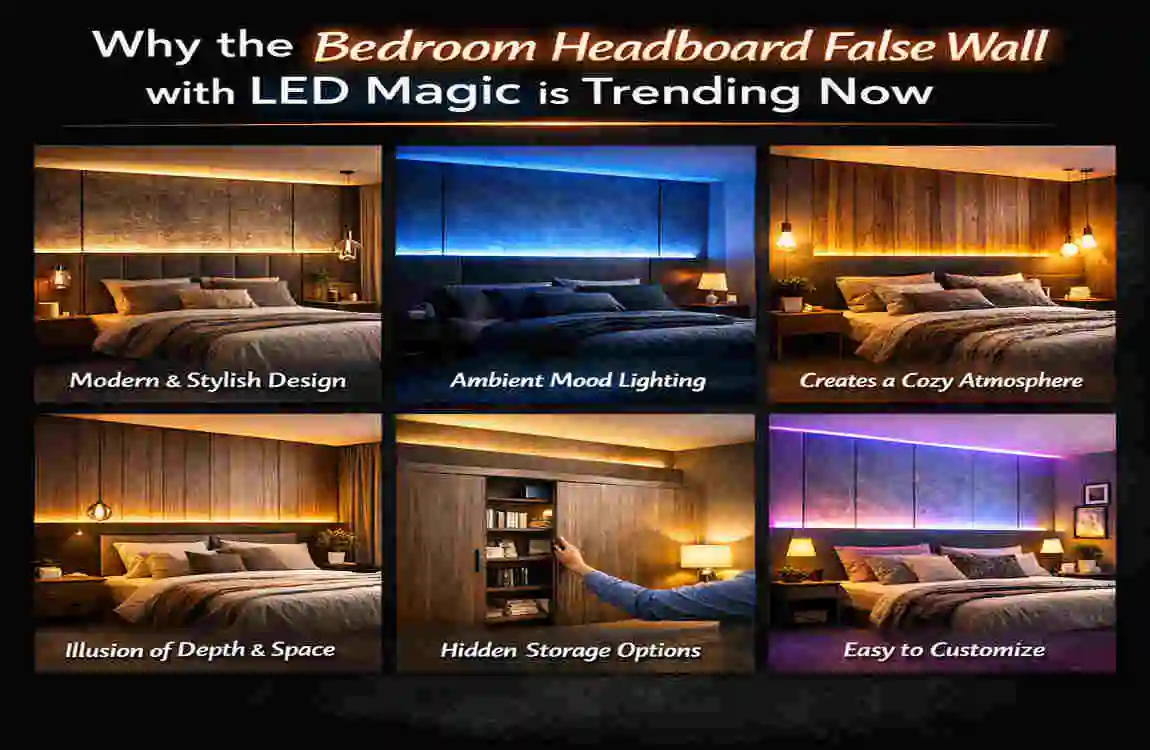
Why the Bedroom Headboard False Wall with LED Magic is Trending Now
You might be wondering why this specific project is suddenly everywhere in April 2026. Why are millions of people spending their weekends measuring wood and peeling the backing off sticky lights? The hype is incredibly real, driven by a few major cultural shifts in how we view our homes.
The Rise of Cosy Maximalism
Over the last few years, we have seen a massive shift in interior design. We are moving away from the cold, sterile, all-white rooms of the past. Today, the hottest trend is Cosy Maximalism. We want our homes to feel like warm, personalised sanctuaries that wrap us in comfort.
A bedroom headboard false wall with LED magic fits perfectly into this vibe. The soft, glowing light radiating from behind the wall mimics the relaxing atmosphere of a high-end luxury hotel spa. It softens the hard edges of your room and creates a deeply calming environment that helps you unwind the second you walk through the door.
Budget-Friendly Luxury
Let’s talk about money. Have you priced a custom, wall-to-wall upholstered headboard lately? You are easily looking at $500, and often well over $1,000.
In stark contrast, this brilliant DIY hack is astonishingly affordable. Depending on the materials you choose, you can easily build this entire setup for anywhere between $50 and $150. You are getting a custom architectural feature in your home for the price of a nice dinner out. This budget-friendly luxury allows anyone, regardless of their income, to elevate their living space.
Incredible Social Proof
You cannot ignore the power of social media. The internet loves a good transformation, and this project delivers massive visual impact. If you browse communities like Reddit’s r/DIY or search the #LEDHeadboard hashtag, you will find over 500,000 posts from everyday people showing off their creations.
We are also seeing a boom in clever Etsy creators selling pre-cut kits for this exact project. Seeing thousands of regular people—not just professional contractors—complete this build gives everyone the confidence to try it themselves.
Total Design Versatility
Finally, this trend is exploding because it is not tied to a single style. Whether your home is an ultra-modern loft, a breezy boho retreat, or a cosy rustic cabin, you can adapt this false wall to fit your aesthetic. Because you control the finishing materials and the colour of the smart LED lights via smartphone apps, the customisation options are literally endless.
Design Ideas for Your Bedroom Headboard False Wall with LED Magic
Before you rush to the hardware store, you need a vision. The beauty of this project lies in its endless adaptability. You are the lead designer, and you get to decide exactly how this focal point will look. Here are some incredibly popular design concepts to spark your creativity.
The Minimalist Glow
If you love clean lines and a clutter-free environment, the minimalist approach is for you. Picture a sleek, perfectly smooth wood panel painted to match your existing walls.
Behind the panel, you install warm white LEDs. This creates a subtle, floating effect. The wall does not demand attention, but it provides a soft, Scandi-inspired glow that makes the room feel incredibly peaceful and sophisticated. This is the perfect design for those who want their bedroom to feel like a quiet Zen retreat.
The Boho Dream
Are you a fan of rich textures, indoor plants, and a more eclectic vibe? The boho dream design will steal your heart. Instead of plain wood, cover your false wall in woven rattan or a beautifully textured, natural linen fabric.
For the lighting, layer in neon pinks and warm oranges, or drape delicate fairy lights along the edges of the wall. When you turn on your bedroom headboard false wall with LED magic, it will highlight the natural woven textures and create a vibrant, cosy, and highly creative atmosphere.
The Luxury Hotel Hack
Do you want your bedroom to feel like a penthouse suite in a five-star hotel? You need to go for the luxury hack. For this design, you will cover your wooden panel with thick quilt batting and a rich, faux leather or velvet fabric. You can even use a staple gun to create a tufted look!
Behind this plush wall, you will run high-quality RGB smart strips. This allows you to create brilliant colour-changing magic. You can set the lights to a deep, moody purple for movie night, or an icy blue when you want to feel cool and relaxed.
The Rustic Cabin Retreat
If you love the farmhouse or cabin aesthetic, let’s bring the outdoors inside. Build your false wall using beautifully weathered, reclaimed wood planks or affordable shiplap boards.
Pair this rough, natural wood with amber-toned LEDs. When the lights hit the grain of the reclaimed wood, it mimics the warm, flickering glow of a crackling fireplace. It instantly makes your room feel like a cosy mountain lodge.
Pro Customisation Tips
When finalising your design, always consider your specific space. Match your bed size carefully. If you have a queen or king bed, make sure your false wall extends at least a few inches past the edges of your mattress to create a balanced look.
Think about height, too. A standard wall might be four feet tall, but extending it to six or seven feet draws the eye upward and makes your ceiling feel much higher! Finally, always choose lights that offer app controls like Govee or Philips, so you can change the vibe without leaving your bed.
Materials and Tools List for Building Your DIY Headboard False Wall
You have your dream design locked in. Now is the time to gather your supplies. One of the best things about this project is that you do not need a massive garage full of professional contractor equipment. The supplies are incredibly accessible and surprisingly cheap.
Here is everything you need to get started on your weekend project. Make sure to double-check your list before leaving the hardware store!
Essential Materials List
For a standard queen-sized bed setup, expect to spend right around $100 in total.
- Plywood or MDF Panels: You will need one standard 4×8-foot sheet. You can have the hardware store cut this down to your desired size (usually 6×4 feet is perfect for a queen bed). MDF is heavier but gives a smoother finish; plywood is lighter and easier to handle.
- LED Strip Lights: You want a 16.4-foot roll of waterproof RGB lights. Make sure they are 12V and come with a smart app controller. Do not cheap out on the lights; this is the “magic” part of the project!
- Wood Battens (Furring Strips): Grab a few 1×2-inch wooden strips. These serve as a frame to push your panel slightly away from the wall, creating the necessary gap for the light to escape.
- Faux Wall Covering: This depends entirely on your design choice. You might buy fabric, peel-and-stick wallpaper, textured paint, or shiplap boards.
- Hardware: You will need a simple power strip, heavy-duty adhesive hooks (Command strips work great for renters), and a small box of wood screws.
Tools Needed
You likely already have most of these in your home toolkit!
- Circular Saw: (Only needed if you are cutting the wood yourself instead of having the hardware store do it.
- Power Drill: Essential for driving screws into your wooden frame.
- Level and Measuring Tape: To ensure your wall isn’t crooked!
- Hot Glue Gun or Staple Gun: To attach your fabric or LED strips securely.
- Sandpaper: To smooth down any rough, splintered wooden edges.
Estimated Cost Breakdown Table
Use this handy table to budget your weekend project.
Item Needed, Estimated Quantity, Estimated Cost
Smart LED Light Strips 1 Roll (16.4 ft) $25.00
Plywood or MDF Sheet 1 Sheet (4×8 ft) $40.00
1×2 Wood Furring Strips 3 Strips $10.00
Wallpaper or Fabric Cover 1 Roll / 3 Yards $20.00
Screws and Adhesive Hooks 1 Small Pack Each $5.00
Total Estimated Budget $100.00
Step-by-Step Guide: How to Build a Bedroom Headboard False Wall with LED Magic
Are you ready to roll up your sleeves? Do not be intimidated if you have never built furniture before. This project is incredibly beginner-friendly. If you take your time, measure twice, and follow these detailed instructions, you will have a stunning new bedroom feature by Sunday evening.
Let’s break down the ultimate guide to building a bedroom headboard false wall with LED magic into six easy, actionable steps.
Plan and Measure Your Space
Every great build starts with a solid plan. Grab a notepad and sketch out how you want the wall to look. Next, grab your measuring tape. You need to measure the width of your actual bed frame.
Pro rule of thumb: You want your new false wall to be slightly wider than your bed. Add at least 6 to 12 inches of overhang on each side. So, if your mattress is 60 inches wide, you want your wooden panel to be at least 72 inches wide. This creates a beautifully framed, luxurious look that grounds the entire room. Take these exact measurements to the hardware store so they can cut your main wooden panel to the perfect size.
Assemble the False Wall Frame
Now you have your large, flat piece of wood. But if you push a flat board against your bedroom wall, there is no room for the lights to shine behind it! You need to build a frame to push it outward.
Take your 1×2-inch wooden furring strips. You are going to create a simple border on the back of your large panel. Cut the strips to size and lay them out like a giant picture frame along the back edges of your plywood. Leave about two inches of space between the edge of the board and your frame.
Use your power drill and wood screws to attach these strips directly to the back of the plywood panel. Add one or two vertical strips in the centre for extra stability. This simple wooden grid adds structure to your wall and creates the perfect hidden tunnel for your lighting.
Install the LED Magic Wiring
It is time to add the magic! Flip your panel over so the wooden frame you just built is facing up. You are going to run your sticky LED strip lights along the outside edge of the wooden furring strips you just screwed in.
Peel the backing off the lights and press them firmly against the wood. Make sure the little LED bulbs are pointing outward, toward the edges of the panel.
Crucial Safety Note: Do not just let your power cords dangle loosely. Hide your channels cleanly. Use small plastic wire clips or a dab of hot glue to secure the power cord against the wood so it stays hidden. Never leave exposed wires, and make sure your power strip is easily accessible to a wall outlet.
Add Your Finishing Touches
Flip the panel back over so the smooth side faces you. It is time to make it look beautiful. If you bought peel-and-stick wallpaper, carefully apply it now, using a plastic squeegee to push out any air bubbles.
If you are using fabric, drape it over the front of the board, pull it tightly around the edges, and use a staple gun on the back of the panel to lock it into place. Imagine you are wrapping a giant, flat birthday present. Take your time to ensure the corners look sharp and professional.
Mount and Test the Magic
This is the moment of truth. Because we promised a renter-friendly build, we are not drilling massive holes into your apartment walls. Instead, take your heavy-duty adhesive hooks (make sure they are rated to hold at least 20-30 pounds combined).
Stick the hooks to your bedroom wall using your level to ensure they are perfectly straight. Lift your finished panel and hang the wooden frame directly onto the hooks behind your bed.
Plug the power cord into the wall, pull out your smartphone, and sync the lights to your app. Tap the power button and watch your room instantly transform! Test out different scenes like “sunset fade” or “party mode” to make sure all the bulbs are working perfectly.
Final Styling and The Glow-Up Reveal
The hard work is done. Now, you get to play interior designer. Push your bed frame tightly up against your new false wall. The weight of your bed will actually help keep the panel pushed securely against the wall.
Layer your mattress with fluffy new pillows, drape a chunky knit throw blanket over the foot of the bed, and place a potted green plant on your nightstand. Turn off the harsh overhead ceiling lights, turn on your glowing headboard, and step back to admire your incredible DIY masterpiece.
Troubleshooting Common Issues
Hit a snag? Check this quick fix table.
The ProblemThe Likely CauseThe Quick Fix
LED lights are flickering—loose power connection. Unplug the strip, check the pin connectors, and push them tightly together.
The wall looks crooked. Measurements were off. Take it down, use a laser level on the wall, and adjust your adhesive hooks.
Wallpaper is bubbling. Dust on the wood. Peel it back slightly, wipe the wood with a damp cloth, dry it, and reapply smoothly.
Lighting Effects and Smart Features to Elevate Your LED Headboard Glow-Up
You have successfully built your bedroom headboard false wall with LED magic. But simply turning it on and off is just the beginning. The technology available in 2026 allows you to take this glow-up to an entirely new, futuristic level. Let’s explore how to get the absolute most out of your new smart lighting.
Master Your Colour Modes
The colour of your room dictates your mood. During the day, set your lights to a crisp, cool white to help you feel energised while folding laundry or reading.
However, when evening rolls around, you must change the mode. Switch your app to a warm, amber-toned white or a deep sunset orange. These warm tones signal to your brain that it is time to produce melatonin, helping you fall asleep much faster. Avoid bright blue lights right before bed!
Seamless Smart Home Integration
If you bought high-quality smart strips, you can connect them directly to your existing home ecosystem. Sync your new headboard to your Amazon Alexa or Google Home system.
Imagine walking into your bedroom with an armful of clothes and simply saying, “Alexa, turn on the bedroom magic.” The lights instantly flare to life. You can even set routines. Program the lights to slowly fade on over thirty minutes in the morning, simulating a natural sunrise to wake you up gently without a jarring alarm clock.
Advanced DIY Lighting Hacks
Want to really impress your friends? Dive into the advanced settings on your lighting app. You can turn on the music sync feature. The app uses your phone’s microphone to listen to your music, making your bedroom headboard a false wall with LED magic pulse and changing colours right along with your favourite playlist!
You can also buy a cheap, plug-in motion sensor. Place it under your bed. When your feet hit the floor for a midnight bathroom trip, the headboard will automatically turn on at a dim 10% brightness, guiding your way without blinding you.
Incredible Energy Savings
Do not worry about this beautiful feature hiking up your electricity bill. Modern LED technology is incredibly efficient. These strips use roughly 80% less power than traditional incandescent light bulbs. You can leave your beautiful accent wall glowing all evening long for just a few pennies a month.
Common Mistakes to Avoid + Pro Tips for a Flawless Install
We want your DIY project to be a massive success, not a frustrating disaster. While this build is easy, there are a few common traps that beginners often fall into. Read through these mistakes to ensure your installation is completely flawless.
Avoid This Major Safety Mistake
The single biggest mistake you can make involves poor wiring. Do not buy the cheapest, nameless brand of lights you can find online. Cheap electronics can overheat. Always look for the UL-certified logo on the box, which guarantees the lights have passed rigorous fire safety tests.
Furthermore, never plug your lights into an overloaded, ancient power strip buried under a pile of clothes. Ensure your outlet has breathing room to prevent any fire hazards.
Essential Pro Tips for Success
- Rent Your Tools: Do not spend $150 buying a brand-new circular saw that you will only use once. Head to your local hardware store and rent the tools for $20 a day, or better yet, borrow them from a neighbour!
- Do a Small-Scale Test: Before you staple expensive fabric to a massive piece of wood, do a test run. Glue a small piece of fabric to a scrap piece of wood. Stick a few inches of LED lights behind it. Take it into a dark closet and turn it on to make sure you actually like the colour and texture combination before committing to the whole build.
Bedroom Headboard False Wall with LED Magic: Before and After Transformations
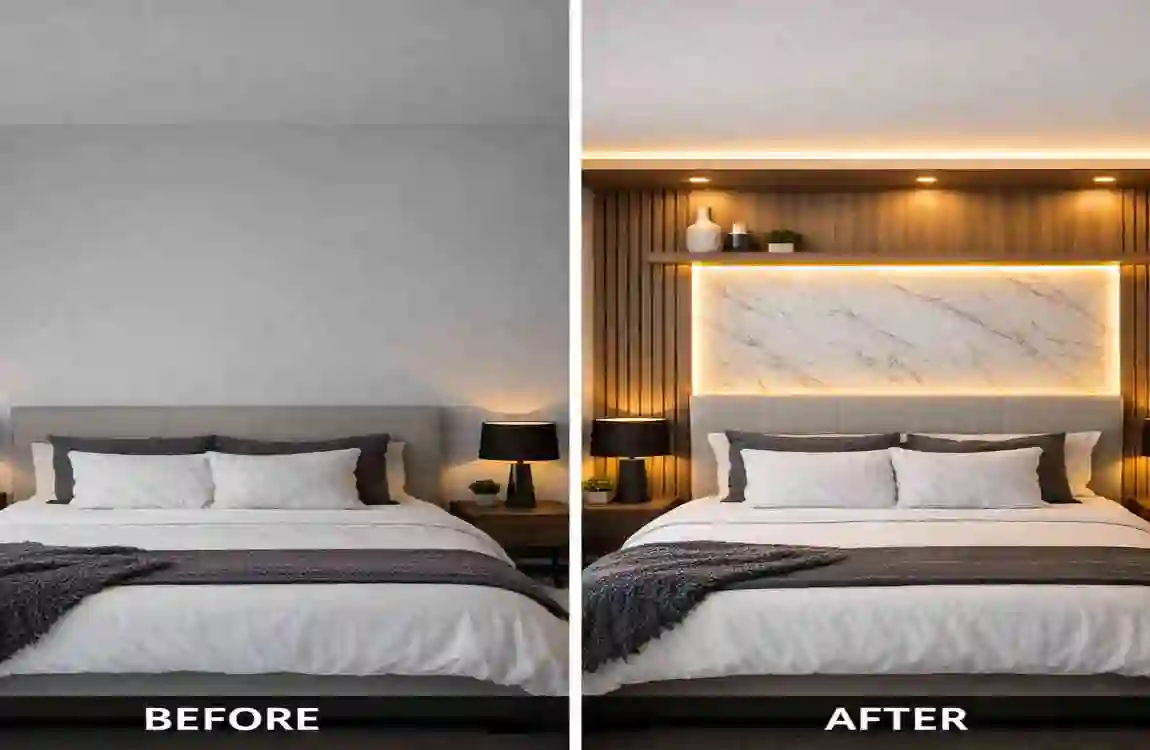
Sometimes, you need to see real results to believe the hype. This project is changing lives and transforming spaces across the country. Check out these two incredible, real-world case studies.
Sarah’s $80 Renter-Friendly Small Space Win
Sarah lives in a tiny, cramped studio apartment in the city. Her landlord strictly forbids painting the walls or drilling heavy mounts. Her sleeping area felt like a boring white box.
She built a tall, narrow false wall headboard with LED magic using lightweight MDF. She covered it in a bold, tropical leaf peel-and-stick wallpaper. She mounted it using damage-free Command strips. For just $80, she completely separated her “bedroom” from her living room space, creating a vibrant, glowing focal point that makes her studio feel twice as expensive.
Mark’s Family Room to Bedroom Conversion
When Mark’s family grew, he had to give up his main bedroom and convert a cold, dark basement into a family room. The room lacked natural light and felt incredibly gloomy.
Mark built a massive, king-sized false wall using warm, natural cedar planks. He installed ultra-bright, warm white LEDs behind the wood. The light bouncing off the wood instantly warmed up the freezing basement, eliminating the gloomy vibe and turning it into a cosy, luxurious retreat.
Frequently Asked Questions
What is a bedroom headboard false wall with LED magic?
It is a highly popular DIY interior design project where you build a freestanding or wall-mounted flat panel to sit directly behind your bed. You then attach smart LED light strips to the back of the panel. When turned on, the hidden lights create a beautiful, magical halo glow around the headboard, adding instant luxury and mood lighting to your bedroom. It is the perfect project for creative DIYers!
How long does it actually take to build?
If you have all your materials ready, this is a perfect weekend project. For a total beginner, expect the entire process—from measuring and framing to hiding the wires and hanging the panel—to take roughly 4 to 6 hours. If you have the hardware store pre-cut your wood, you can easily finish it in a single afternoon.
Is this project really renter-friendly?
Yes, absolutely! Because the wooden panel is relatively lightweight, you do not need to drill massive holes or use heavy anchor bolts that will upset your landlord. You can safely mount the false wall using heavy-duty, removable adhesive wall hooks. When your lease is up, you pull the adhesive tabs, take the wall down, and leave behind a perfectly clean, undamaged wall.
What are the best LED strips for this project?
While you can find cheap lights everywhere, we highly recommend investing in trusted smart brands like Govee or Philips Hue. These brands offer vastly superior colour accuracy, bulbs that last for years without burning out, and seamless smartphone app control. They also integrate seamlessly with your home WiFi, letting you control the “magic” with simple voice commands.