
While a faulty door frame might seem like a minor annoyance at first, it actually plays a huge role in your daily life. Your bedroom is your personal sanctuary. A properly functioning door ensures your privacy, keeps out cold drafts, helps control noise from the rest of the house, and contributes to your home’s overall aesthetic. When the frame is busted, all of these comforts fly right out the window.
In the following sections, you will learn exactly what is going on with your stubborn door. We will walk you through how to identify different types of damage, from stripped screws to split wood completely. You will discover exactly what tools you need from your garage, when a simple repair will do the trick, and when you need to replace the frame fully. Plus, we will help you figure out when to take the DIY route and when it is finally time to call in a pro. Grab your tool belt, and let’s dive in!
Why Your Bedroom Door Frame Gets Damaged
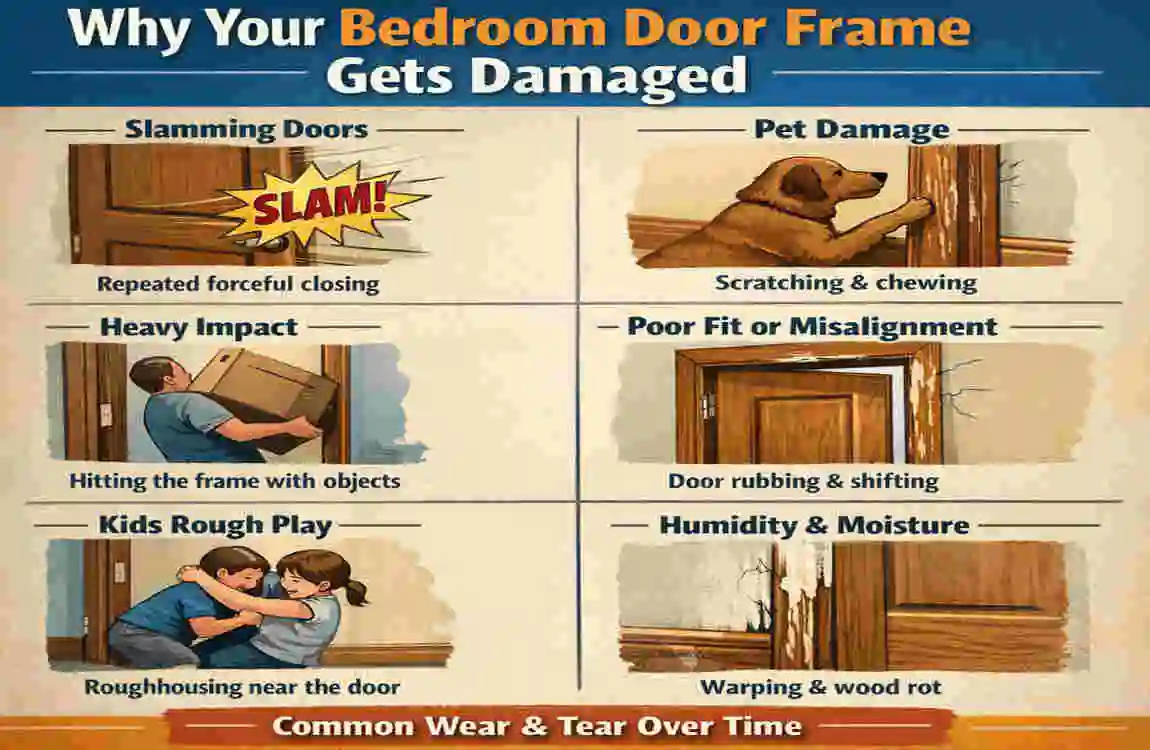
Before you can fix the problem, it helps to understand why your door frame broke in the first place. Door frames take a surprising amount of abuse over the years. Understanding the root cause of the damage will help you choose the right repair method and prevent the issue from happening again.
Here are the most common culprits behind a damaged bedroom door frame:
- Kicks or heavy impacts: Let’s face it, life happens. Kids get rowdy, large pets jump against the wood, and teenagers (or adults!) accidentally slam the door in frustration. Sudden impacts can easily crack the wood or rip the hinges right out of the frame.
- Seasonal wood expansion and contraction: Wood is a natural, porous material. During hot, humid summers, the wood absorbs moisture and swells. In cold, dry winters, it shrinks. Over time, this constant shifting weakens the wood and loosens the screws holding everything together.
- Moisture and high humidity: Bedrooms, especially those with attached en-suite bathrooms, can trap moisture. If your bedroom lacks proper ventilation, the damp air can cause the wood to warp, soften, or even rot over time.
- Poor initial installation: Sometimes, the problem has been there since day one. If the builder used cheap materials, failed to use enough shims, or did not level the frame perfectly, the door will eventually start to sag and pull on the frame.
- Old age and weak materials: Older homes have undeniable charm, but aging wood naturally turns brittle. Even regular, gentle use can cause an old frame to splinter over the decades.
When these issues happen, they directly affect the structural integrity of your loose bedroom door frame—the constant pulling and shifting lead to stripped screw holes, sagging doors, and annoying gaps.
This is not just an aesthetic issue. A broken door jamb in a bedroom affects your safety and comfort. It creates annoying drafts that drive up your heating bill, lets noise from the living room TV in, and makes it impossible to lock your door for privacy. By identifying the cause, you are one step closer to a permanent fix.
Signs You Need to Fix Your Bedroom Door Frame
How do you know if your door needs a little oil on the hinges or if the frame itself is actually compromised? Your door will usually give you a few very clear warning signs before it completely fails.
Look out for these common symptoms. If you recognize them, it is time to take action:
- The door no longer closes or latches smoothly: You have to lift the handle, push with your shoulder, or jiggle the knob to get the latch to click into place. This usually means the frame has shifted or the door is sagging.
- Visible cracks, splinters, or dents in the frame: Take a close look at the wood around the hinges and the strike plate (the metal plate where the latch catches). If you see hairline splits running vertically through the wood, the structural integrity is compromised.
- Gaps around the door (top, sides, bottom): Close your door and turn on the light inside your bedroom while keeping the hallway dark. If you see uneven lines of light peeking through the top or sides, your frame is out of square.
- The door hits the floor or rubs against the frame: If your door leaves scratch marks on your bedroom carpet or loudly scrapes the top of the frame when you open it, the hinges have likely pulled away from the damaged wood.
- Loose or wobbly hinges: Open the door halfway and gently lift on the door handle. If you see the metal hinges wiggling inside the wood frame, the screw holes are stripped.
- The door touches the frame only at certain points: A properly aligned door should sit flush against the door stop (the small strip of wood inside the frame). If it hits the top corner but leaves a gap at the bottom, the frame is twisted.
Each of these symptoms is a massive red flag that you need to learn how to fix bedroom door frame issues. Ignoring these small signs will only lead to bigger cracks and more expensive repairs later.
Quick Pre-Repair Checklist: Before you run to the hardware store, ask yourself:
- Is the wood soft and crumbly (rot), or hard but cracked (impact damage)?
- Does the door close if I gently lift it?
- Are the screws spinning endlessly when I try to tighten them?
Keep your answers in mind as we move on to the next steps!
Tools and Materials You’ll Need
One of the best things about learning how to fix bedroom door frame problems is that you likely already have most of the necessary tools sitting in your garage or utility drawer. You do not need expensive, specialized carpentry equipment for most basic repairs.
Here is a breakdown of what you will need, depending on the severity of your damage.
Basic Tools
These are the everyday items you need for almost any door repair:
- Screwdriver or a power drill/driver: Essential for removing hinges and driving new screws.
- Hammer, pry bar, and a wood chisel: Perfect for tapping out hinge pins, removing old trim, and clearing away splintered wood.
- Tape measure, bubble level, and a pencil: Accuracy is everything. You will need these to make sure your frame is perfectly straight and aligned.
Materials for Repairs vs Replacement
If you are dealing with minor damage like stripped screws or small cracks, gather these materials:
- Wood filler, epoxy, or carpenter’s putty: Used to fill in cracks and reshape missing chunks of wood.
- Wood screws: Grab a box of 3-inch wood screws. These are longer than standard door screws and will reach past the damaged frame directly into the sturdy wall studs.
- Wooden dowels or toothpicks, wood glue, clamps, and sandpaper: These are the secret weapons for fixing stripped screw holes and smoothing out your repair work.
Materials for Full Replacement
If the frame is completely shattered or rotting, you will need to replace it. For this, add the following to your shopping list:
- A new door jamb kit or raw lumber: Pre-cut jamb kits are incredibly DIY-friendly.
- Wood shims: Small, wedge-shaped pieces of wood used to make the frame perfectly level.
- Caulk, finish nails, and trim tools: To seal the gaps and reattach your decorative door casing once the frame is installed.
Do not let this list intimidate you! Most homeowners can grab these basic supplies for under $30 at their local home improvement store.
Remove the Door and Existing Hardware
When you are learning how to fix a bedroom door frame, your first instinct might be to grab a drill and start driving screws while the door is still hanging. Stop right there! Leaving a heavy, swinging door attached to the frame makes the repair process frustrating, dangerous, and much less accurate. Removing the door first is essential.
Here is how to safely get that door out of your way:
First, close the door so the latch supports it. Grab your hammer and a large nail (or a dedicated hinge pin punch). Place the tip of the nail at the bottom of the hinge pin. Gently tap the nail upward with your hammer until the hinge pin pops out of the top. Repeat this process for the middle and top hinges.
Once all the pins are out, carefully open the door. Grabbing the door by the middle, lift it straight up and away from the hinges. Safety Tip: Interior doors can be surprisingly heavy! If you have a solid wood door, ask a friend or family member to help you lift it so you don’t hurt your back or drop the door and dent your beautiful bedroom floor. Carefully lay the door flat on the floor in another room or lean it securely against a wall on a soft towel.
Next, you need to strip the frame of its hardware. Grab your drill or screwdriver and remove the empty metal hinges that are still attached to the wood. Move over to the other side of the frame and unscrew the metal strike plate.
If your frame is severely damaged and you plan to do a full replacement, you will also need to use your pry bar to gently pull off the decorative trim (casing) around the door. If you work slowly and carefully, you can reuse this trim later!
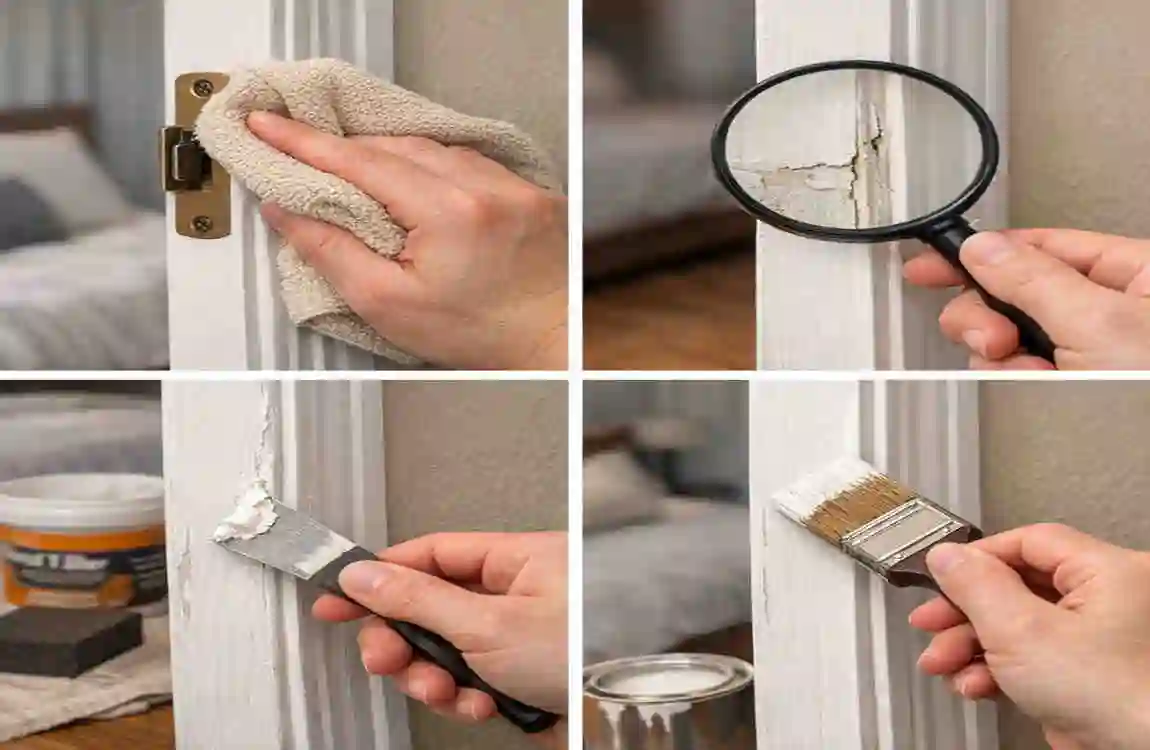
Inspect the Frame and Identify the Problem
With the door safely out of the way, you finally have a clear view of the crime scene. Now is the time to play detective. Grab a flashlight and closely inspect the bare wood of the door jamb. You need to identify exactly what went wrong so you can apply the correct fix.
Here are the four most common issues you will find:
Loose Hinges and Stripped Screws
Look closely at the holes where the hinges used to be attached. If the holes look wide or jagged, or if the wood around them is crumbled, the screw threads no longer have any wood to bite into. This is why your door was sagging.
Split or Cracked Door Jamb
Inspect the wood running vertically up the frame. Did someone slam the door too hard? You might see a visible crack running right through the hinge area or near the latch. If it is a hairline crack, it is an easy fix. If the wood is shattered into multiple pieces, it requires a bigger intervention.
Out-of-Square Frame
Place your bubble level vertically against the side of the door jamb. If the bubble is not resting dead center between the lines, your frame is leaning. An out-of-square frame prevents the door from swinging properly, creating annoying gaps.
Damaged Strike-Plate Area
Look at the side of the frame where the door latches. If you have teenagers or someone accidentally kicked the door while it was locked, the wood around the strike plate might be completely blown out or splintered.
To help you decide your next move, use this quick diagnostic table:
The Problem You See: The Likely Cause: The DIY Repair Type Needed
Screws spin and won’t tighten. Heavy door use; natural wood wear and tear. Fill stripped holes & use longer screws. (Go to Step 3)
Visible vertical crack in the wood. Sudden impact, slamming, or seasonal wood shifting. Wood glue, epoxy, and clamping. (Go to Step 4)
Wood around the latch is blown out. The door was forced open or kicked while locked. Cut out bad wood and rebuild the block. (Go to Step 5)
Gaps around the door; the level is off. Poor installation, or the house foundation has settled. Remove trim, adjust shims, and realign. (Go to Step 6)
Wood is rotting or completely shattered. Water damage, termites, or massive blunt force. Full frame removal and replacement. (Go to Step 7)
Pinpoint your specific problem from the table above, and let’s move on to the corresponding repair step!
Repairing a Loose or Wobbly Bedroom Door Frame
If your diagnostic check revealed stripped screw holes, you are in luck. This is the easiest and most common way to learn how to fix bedroom door frame issues, and it requires almost zero carpentry experience. When the screw holes in the frame get worn out, the hinges pull away from the wall, causing the door to lean downward and scrape the floor.
We need to give those screws fresh wood to grip. Here is how you do it.
Filling Stripped Screw Holes
You have two great options here. The classic DIY hack is the “toothpick method.” Take a handful of wooden toothpicks (or wooden matches with the heads cut off) and dip them in strong carpenter’s wood glue. Stuff as many of them as you can tightly into the stripped screw hole. Once the hole is packed tight, break off the ends so they are perfectly flush with the surface of the door frame. Let the glue dry completely (usually about an hour). You have now created a brand-new, solid wooden core for your screw to bite into!
If the hole is exceptionally large, you can drill it out slightly to make it perfectly round, then hammer in a thick wooden dowel coated in wood glue. Cut the dowel flush with a small saw.
Tightening and Replacing Screws
Once your filler wood is dry, it is time to upgrade your hardware. Throw away the short, 1-inch screws that originally came with the door. Instead, grab sturdy 3-inch wood screws. Place your hinge back into the recess and drive the long screws through the hinge and into the frame, and deeply into the heavy 2×4 wall studs behind the frame. This anchors the door to the actual structure of your house, making it incredibly strong.
Re-hanging the Door
Lift the door back into place, line up the hinge brackets, and drop the pins back in. Check the alignment by opening and closing the door a few times. It should swing smoothly and sit perfectly level.
Fixing a Split or Cracked Door Jamb
Sometimes the damage goes beyond a stripped screw. If a heavy draft caught your bedroom door and slammed it against the frame, you might be looking at an ugly, vertical split in the wood. A cracked jamb compromises the hinges’ strength. But do not panic—you can repair a cracked bedroom door frame jamb without ripping the whole thing out of the wall.
Cleaning and Sanding the Damaged Area
First, you need to clean out the wound. Use a utility knife or a small chisel to gently remove any loose, hanging splinters of wood from the crack. You want to work with a clean, solid surface. Next, use medium-grit sandpaper to lightly sand the area around the crack, removing any old paint and creating a slightly rough surface for your filler to adhere to.
Applying Wood Glue or Epoxy
If the crack is a clean split and the wood is still attached, squeeze high-quality wood glue deep into the crack. You can use a toothpick to push the glue as far back as possible. Once filled, clamp the wood tightly together with a C-clamp (place small pieces of scrap wood between the clamp and the door frame to prevent denting your trim). Wipe away any excess glue that squeezes out with a damp cloth and let it dry overnight.
If the crack has left a gaping hole or missing chunks of wood, you will need a two-part wood epoxy or high-performance wood filler. Mix the epoxy according to the package directions, then press it firmly into the damaged area with a putty knife. Overfill the hole slightly, as the epoxy may shrink slightly during cure.
Sanding and Finishing
Once the glue or epoxy is rock hard, grab a sanding block. Sand the repaired area vigorously until it is perfectly smooth and perfectly flush with the original frame. Run your hand over it; you shouldn’t be able to feel where the wood ends and the repair begins.
When to replace instead: If the crack runs the entire length of the door frame, or if the wood is splintered into dozens of tiny, un-clampable pieces, a glue repair will not hold the weight of the door. You will need to look at a full replacement.
Rebuilding a Kicked‑In or Broken Strike Plate Area
The strike plate is the small metal rectangle on the frame that catches the door latch and keeps the door closed. Because this area bears the brunt of force when a locked door is pushed, pulled, or kicked, it is a common site of severe damage. If you have kids who play rough, learning how to fix a broken strike plate area is a necessary homeowner skill.
Since this area dictates whether your bedroom door can lock securely, you cannot just fill a massive blowout with soft wood putty and hope for the best. You need to rebuild it with solid wood.
Removing the Damaged Wood
Start by removing the metal strike plate if it is still clinging to the frame. Take a pencil and draw a neat rectangle around the damaged, splintered wood. Grab your wood chisel and a hammer. Carefully chisel out the damaged wood within the rectangle you drew. You want to create a clean, uniform rectangular hole in the frame, carving down about half an inch deep. Take your time here; precision makes the next step easier.
Inserting a New Wood Block
Next, find a small piece of scrap wood (like pine or oak) and cut it to the exact dimensions of the rectangular hole you just chiseled out. This new wooden block will act as your patch. Coat the back and sides of the wooden block with wood glue, then tap it into the hole with your hammer. It should be a snug, tight fit. Secure the block by driving two small finishing nails into it, and let the glue dry. If there are tiny gaps around the edges, fill them with wood filler and sand it smooth.
Re-Installing the Strike Plate
Now you have a fresh, solid piece of wood. Hold your metal strike plate against the new wood block in the correct position and trace the latch hole in the center. Use a drill with a spade bit to drill a hole through the center of the door latch mounting hole. Finally, pre-drill tiny pilot holes for the screws, and screw the strike plate firmly back into place. Test the door to ensure the latch clicks securely into place.
Safety Note: If you find that your family’s doors are frequently getting slammed or damaged near the latch, consider installing soft-close door mechanisms or simple rubber door stoppers. This adds an extra layer of child-friendly protection to your freshly repaired frame.
Realigning an Out‑of‑Square Bedroom Door Frame
Sometimes you look at your door frame and see no cracks, no stripped screws, and no obvious trauma. Yet, the door refuses to close, leaving a massive, uneven gap at the top. When this happens, your bedroom door frame is “out of square” or twisted.
This usually happens when a house settles over time, shifting the wooden studs inside the walls. Fixing an out-of-square frame requires patience and a good eye for detail.
Checking for Plumb and Level
First, grab your reliable bubble level. Place it vertically against the side jambs to check for “plumb” (perfectly straight up and down). Then, place it horizontally across the top piece of the frame (the head jamb) to check for “level.” Take note of which way the bubble tilts. This tells you which direction the frame needs to be pushed.
Using Shims to Adjust Alignment
To fix this, you will need to get behind the door frame. Use your pry bar to gently remove the decorative trim (casing) from the side of the door that needs adjustment. This will expose the gap between the door jamb and the actual wall studs.
Take a wooden shim (a thin, wedge-shaped piece of wood) and slide it into the gap between the jamb and the wall stud. Tap it gently with a hammer. As you tap the wedge deeper, it will physically push the door frame outwards. Keep checking your level as you tap the shim. Once the frame is perfectly straight, use a utility knife to score the shim, then snap off the piece that extends past the wall.
Securing the Frame
Once the frame is level and the gaps around your door are beautifully even, you need to lock it into place. Drive long wood screws straight through the door jamb, through the wooden shims you just inserted, and deep into the wall studs. This permanently secures the frame in its newly aligned position.
If you notice that your door frame keeps twisting year after year, or if you see large diagonal cracks in your bedroom drywall, you may be dealing with serious structural foundation issues that go beyond a simple DIY door repair.
Replacing a Severely Damaged Bedroom Door Frame
There comes a point in every DIY journey where you have to admit defeat on a repair and opt for a total replacement. If your bedroom door frame has severe rot from a bathroom leak, is destroyed by termites, or has been kicked so hard that the wood is shattered into shards, patching it up will not work.
While this sounds intimidating, replacing a frame is actually an incredibly satisfying project if you take it step by step.
Removing the Old Frame
Start by removing the door and prying off the decorative trim on both sides of the wall. Next, take a reciprocating saw (or a simple handsaw) and cut straight through the middle of the left and right side jambs. By cutting them in half, you relieve the tension, making it incredibly easy to take a pry bar and rip the old, damaged wood right out of the wall opening. Clear away any old nails or debris left behind.
Measuring and Buying
Measure the width and height of the raw “rough opening” in your wall. Head to the hardware store and purchase a pre-hung interior door kit or a basic door jamb kit that fits your measurements. A pre-hung kit includes the door already attached to a brand-new frame, which saves you a massive amount of measuring and hinge-cutting!
Installing the New Frame
Slide the new door frame into the rough opening. This is where your bubble level becomes your best friend. Use wooden shims between the new frame and the wall studs to ensure the sides are perfectly plumb and the top is perfectly level.
Securing the Frame
Once it is sitting perfectly straight, drive 3-inch wood screws or heavy finish nails through the frame and shims into the wall studs. Test the swing of the door. If it opens and closes smoothly without binding, you have successfully replaced your frame!
Advanced DIY Note: Always double-check your floor height before installing a new frame. If you recently installed thick new bedroom carpet or raised hardwood floors, you may need to trim a little bit off the bottom of the new frame before installing it so it clears the floor.
Finishing Touches: Painting, Sealing, and Reinstalling Trim
You have successfully learned how to fix the mechanics of the bedroom door frame, but the job isn’t done until it looks good. Whether you patched a small crack with epoxy or installed a brand-new raw wood jamb, the finishing touches are what make your DIY work look like a Premium, professional job.
Sanding and Priming
If you did any patching or filling, give the area one final, gentle sanding with fine-grit sandpaper. Wipe away all the sawdust with a slightly damp microfiber cloth. If you are working with raw wood or large areas of wood filler, you must apply a coat of high-quality wood primer. Primer seals the wood and ensures your topcoat of paint adheres smoothly without soaking into the porous surface.
Painting and Staining
Once the primer is dry, apply your paint or stain. Paint Tip: Choose a semi-gloss or satin finish paint for door frames. These finishes are highly durable, easy to wipe clean of fingerprints, and naturally reflect light, which helps hide any minor, lingering imperfections or dents in your repair work. Apply two thin coats rather than one thick, gloppy coat.
Reinstalling the Trim
If you removed the decorative door casing (trim) during your repair, it is time to put it back. Run a thin bead of construction adhesive along the back of the trim, then press it against the wall. Secure it using a brad nailer or hammer small finish nails. To get a truly flawless look, run a thin line of painter’s caulk along the seam where the trim meets the door frame and the wall. Smooth it with a wet finger. Once painted, the frame will look like it was built with the house!
Safety, Common Mistakes, and What to Avoid
DIY home improvement is incredibly rewarding, but it is easy to make a small error that creates a massive headache later. Keep these safety tips and common pitfalls in mind as you work.
Safety First: Always wear safety glasses when using hammers, chisels, or power saws. Wood splinters can fly unpredictably. If you are pulling old frames out of the wall, wear heavy leather gloves to protect your hands from rusty, hidden nails.
Common Mistakes to Avoid:
- Over-tightening screws: When you use a high-powered drill to drive screws into the door jamb, it is incredibly easy to drive the screw too deep. This will instantly split the wood and ruin your repair. Always set your drill to a lower torque setting, or finish tightening the last few turns with a manual screwdriver.
- Skipping the level: “Eyeballing” a door frame never works. If your frame is off by even a quarter of an inch, your door will naturally swing open or refuse to latch. Always trust the bubble level.
- Using the wrong filler: Do not use drywall spackle or standard wall joint compound to fix a wooden door frame. Those materials dry incredibly brittle and will crumble the first time the door is closed. Always use a dedicated wood filler or epoxy.
- Ignoring structural issues: If your door frames are repeatedly warping, or you fix a gap only for it to return three months later, do not keep patching it. You likely have a foundation settling issue that needs professional attention.
When to Call a Professional Instead
We firmly believe that most homeowners can learn how to fix a bedroom door frame using this guide. However, there is no shame in knowing when a project is out of your depth. Sometimes, calling a professional carpenter or a skilled local handyperson is the smartest, safest move you can make.
You should consider putting down the tool belt and picking up the phone in these situations:
- Major Structural Damage: If the wall studs behind the door frame are rotting, bowing, or heavily termite-damaged, replacing the cosmetic frame will not solve the danger. You need a framing expert.
- Multiple Doors Acting Up: If every single bedroom door in your hallway suddenly stops closing correctly at the same time, your home’s foundation is shifting. A door repair won’t help; you need a foundation inspection.
- Complex Custom Millwork: If you live in a historic home with intricate, hand-carved, solid mahogany door frames, do not take a chisel to them. Hire a restoration carpenter who specializes in preserving vintage architecture.
- Rental Properties: If you rent your home or apartment, attempting a DIY repair might violate your lease agreement and cost you your security deposit. Always call your landlord or property manager first.
A professional handyperson can often diagnose the issue instantly, complete the job cleanly in a couple of hours, and save you the frustration of trial-and-error DIY.
Cost‑Saving Tips for Fixing a Bedroom Door Frame
Home repairs can get expensive, but fixing a bedroom door frame does not have to break the bank. If you are smart about how you approach the project, you can keep your expenses remarkably low.
Here are a few ways to stretch your DIY budget:
- Raid your own toolbox: You do not need to buy a $100 power drill if a $5 manual screwdriver will do the job. Look at what you already own. If you need a specialty tool, ask a neighbor or look into borrowing tools from a local community tool library.
- Buy only what you need: If the left side of your door jamb is kicked in but the top and right sides are perfectly fine, do not buy a $150 full-pre-hung door kit. Head to the lumber aisle and buy a single piece of raw door jamb molding for $15. You can replace just the broken leg of the frame!
- Practice Preventive Care: The cheapest repair is the one you never have to make. Spend $5 on a spring-loaded wall door stopper. This prevents the door handle from smashing into the drywall and prevents the hinges from hyperextending and cracking the frame.
Cost Comparison: Buying wood glue, dowels, and some new screws to fix a loose hinge will cost you roughly $15. Doing a full DIY frame replacement will cost about $50 to $100 in materials. Conversely, hiring a local handyperson to replace a door frame typically costs between $200 and $400 in labor alone. By doing it yourself, you are keeping a significant amount of money in your pocket!
If you are looking for high-quality hinges, durable wood epoxy, or expert advice, be sure to check out your local hardware store’s professional desk—they are usually happy to point you toward the most cost-effective materials.
Preventive Maintenance: How to Protect Your Bedroom Door Frame
Now that you have put in the hard work to fix your door frame, you want to make sure it stays perfectly aligned for years to come. A bit of easy, routine maintenance will dramatically extend the life of your doors.
Try implementing these simple habits in your home:
- Install door stoppers: As mentioned above, a simple floor or wall-mounted door stop absorbs the impact of a swinging door, protecting both the wood frame and your drywall.
- Upgrade to soft-close hinges: If you have heavy solid-core doors or family members who love to slam doors in a rush, swap out your standard hinges for soft-close spring hinges. They catch the door before it forcefully hits the frame and close it gently.
- Control humidity: Because bedrooms get humid, run a dehumidifier during sticky summer months, or ensure your home’s HVAC system is circulating air properly. Keeping wood dry prevents it from swelling, warping, and splitting.
- Do a yearly screw check: Once a year, take a manual screwdriver and gently check the screws on all your door hinges. If they feel a little loose, tighten them up. Catching a loose screw early prevents the hinges from sagging and stripping the wood out completely.
By taking these small steps, you drastically reduce the chances of ever having to research how to fix bedroom door frame issues ever again!
FAQ Section
Still have a few lingering questions? Here are the answers to the most common queries homeowners have when tackling this project.
Q: How hard is it to fix a bedroom door frame yourself?
A: It is surprisingly manageable! Minor repairs like tightening loose screws, filling small cracks, or replacing a strike plate are beginner-friendly and require no prior carpentry experience. Full frame replacements are more of an intermediate project, requiring careful measuring and leveling.
Q: Can I fix a bedroom door frame without removing the door?
A: While you technically can attempt to tighten a screw while the door is hanging, we strongly advise against it. Leaving the heavy door attached puts constant tension on the hinges, making it very difficult to align things properly. Removing the door takes two minutes and makes the repair infinitely easier and safer.
Q: What’s the best wood filler for a bedroom door frame?
A: For small, cosmetic scratches, standard carpenter’s wood putty works fine. However, if you are repairing structural areas (like near the hinges or latch), you must use a two-part wood epoxy. Epoxy dries harder than the actual wood and can hold the weight of screws without crumbling.
Q: How long does it take to fix a bedroom door frame?
A: A simple fix (like the toothpick hack for loose screws) takes about 15 minutes of active work. Patching a crack with epoxy requires a few hours of drying time. A full door frame replacement will generally take a DIY beginner an entire Saturday afternoon.
Q: When should I replace the frame instead of repairing it?
A: You should opt for a full replacement when learning how to fix a bedroom door frame with glue is no longer viable. This includes severe water rot that makes the wood spongy, extensive termite damage, or impact damage that has shattered the wood into multiple, un-clampable pieces.