
Imagine standing in your living room, staring at the faded walls that no longer match your vibe. You’re excited about a fresh coat of paint but intimidated by the thought of messing it up. Sound familiar? If you’re wondering how to paint a house interior without hiring expensive pros, you’re in the right place. This ultimate DIY guide is your roadmap to stunning results, even as a total beginner.
Painting your own home can save you $500 to $2,000 per room compared to professional costs. You’ll get that pro-level finish while personalising every corner to your taste. According to Home Depot surveys, about 70% of homeowners tackle DIY interior painting projects themselves—and for good reason. It’s rewarding, affordable, and way more straightforward than it looks.
Why Paint Your House Interior DIY? Benefits and Cost Savings
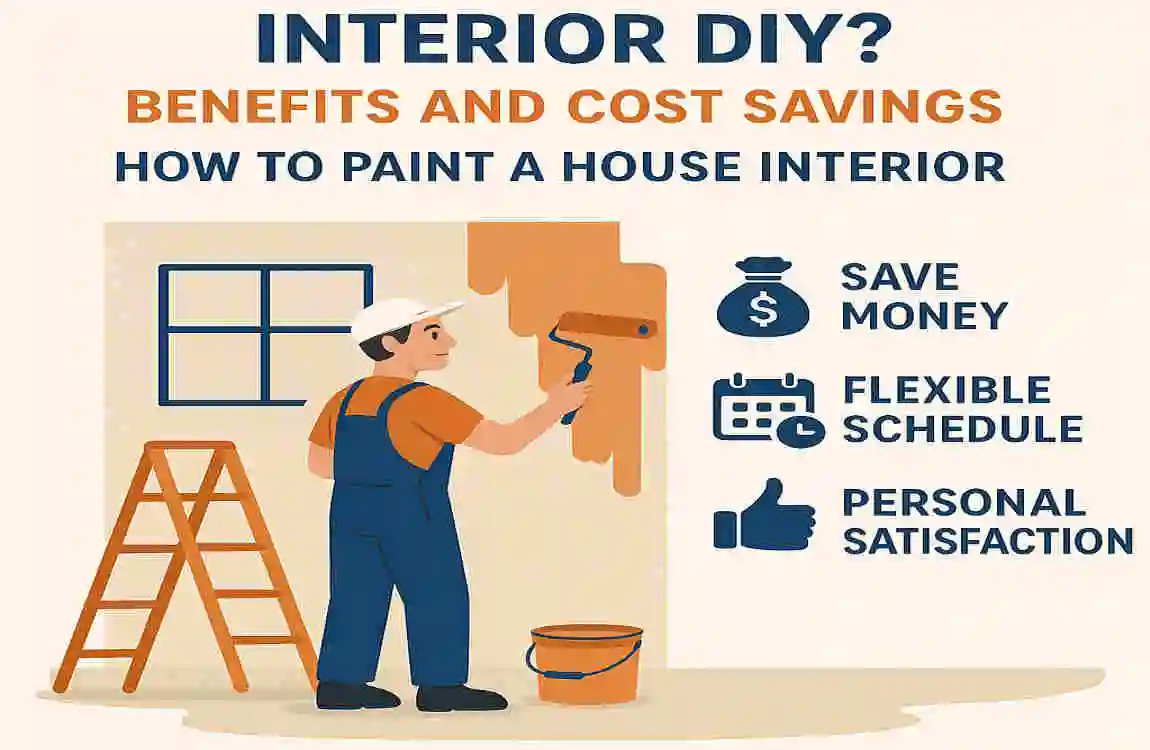
Painting your house interior yourself isn’t just about saving money—it’s a smart move for your wallet, health, and happiness. Think about it: a fresh coat transforms drab rooms into cosy havens. But why go DIY when you can call in the pros?
First off, cost savings are massive. Professional painters charge $2 to $6 per square foot, including labour. For a standard 12×12 room (about 400 sq ft), that’s $800 to $2,400. DIY? You’re looking at $0.50 to $1 per square foot for paint and tools, totalling just $200 to $400. That’s cash back in your pocket for furniture or a celebratory dinner.
Beyond bucks, customisation shines. Pros might rush with neutral shades, but you pick colours that fit your life. Want blues for a calm bedroom? Earthy greens for a lively kitchen? DIY lets you experiment. Plus, health perks come from low-VOC paints. These “volatile organic compound”-free options cut indoor air pollution, easing allergies and improving sleep—perfect for families.
You’ll also build skills. This paint-house-interior DIY project is beginner-friendly and offers huge returns. Imagine the pride of saying, “I did that!” It’s therapeutic too—many find the process stress-relieving.
Cost Comparison: Pro vs. DIY (12×12 Room)
Item Pro Cost DIY Cost
Paint (2 gallons) $200 $200
Tools/Supplies Included $100-200
Labour $800-2,200 $0 (your time)
Total $1,000-2,400 $300-400
See the difference? Affordable paint-house interior DIY projects like this boost resale value, too. Your luxury home feels new without the hefty price tag. What’s stopping you? Grab that brush and start saving.
Tools and Materials Checklist for How to Paint a House Interior
Before you dive into how to paint a house interior, stock up on the right gear. The right gear makes your beginner house painting guide smooth and frustration-free. Don’t skimp—quality tools last for multiple rooms.
Let’s break it down into essentials. Start with essential tools. These are your workhorses.
Essential Tools List:
- Paint rollers: Grab a 9-inch one with a 3/8-inch nap for smooth walls. Add an angled mini-roller for edges.
- Paint trays and liners: Keep mess contained; liners make cleanup a breeze.
- Brushes: 2- to 3-inch angled sash brushes for cutting in; a 1-inch brush for trim.
- Drop cloths and plastic sheeting: Canvas for floors, plastic for furniture—protect like a pro.
- Painter’s tape: Blue tape (like FrogTape) for crisp lines without bleed.
- Ladders or step stools: Extendable ones for ceilings; ensure stability.
- Sandpaper: 120-220 grit for smoothing repairs.
- Putty knife and caulk gun: For patching holes and gaps.
Now, materials list. Paint is king here, but prep matters too.
Materials List:
- Primer/sealer: One gallon per 350-400 sq ft; Zinsser or Kilz for tough spots.
- High-quality paint: Latex for easy cleanup. Eggshell sheen for living rooms (hides flaws); semi-gloss for bathrooms.
- Cleaner/degreaser: TSP substitute (like Krud Kutter) for greasy walls.
- Spackle or joint compound: Fills dents.
- Quantities tip: One gallon covers 350-400 sq ft per coat. For a 12×12 room (walls + ceiling: ~500 sq ft), buy 2 gallons of paint and 1 gallon of primer.
Beginner Tips for Budgeting:
- Total for a 12×12 room: $200-$500. Shop sales at home centres.
- Go eco-friendly: Low-VOC paints like Benjamin Moore Natura.
- Rent big-ticket items like sprayers if needed (though rollers work great for starters).
Preparation: The Key to Pro-Looking Results in House Painting
Ever heard “70% of painting success is prep”? It’s true. Skimp here, and your how to paint a house interior project looks amateur. Nail prep, and walls gleam like a pro job. Let’s walk through it step by step—you’ve got this.
Room Assessment
Start smart. Measure square footage: walls (length x height x 2) + ceiling. Note issues—cracks, water stains, or peeling paint signal deeper fixes like leaks. Check trim for rot. Ask yourself: “Does this room need primer everywhere?” For dark-to-light changes, yes.
Furniture and Floor Protection
Clear the space. Move furniture to the centre or out. Cover with plastic sheeting, secured with tape. Lay drop cloths on the floor and tape the edges down. Pro move: Remove switch plates and outlet covers for a clean slate. Imagine spills ruining your rug? Not today.
Cleaning Walls
Dirt kills adhesion. Mix TSP substitute with water; wash walls top-down with a sponge. Rinse well. For kitchens, hit grease with a degreaser. Dry thoroughly—fans speed up the drying. Ventilate: Open windows, use fans. This step ensures paint sticks like glue.
Repairs
Hunt flaws. Fill holes with spackle using a putty knife; let dry 1-2 hours. Sand smooth (220 grit). Caulk gaps around trim with a caulk gun—soft with a wet finger. Sand again. Feels tedious? It’s your ticket to flawless walls.
Taping and Masking
Tape like a boss. Apply blue painter’s tape to edges, trim, and outlets. Press firm for no leaks. Mask baseboards if needed. Pro tip: “Cut in” paint first to seal the tape.
Safety first: Wear gloves, goggles, and an N95 mask to protect against dust. Ventilate fumes. Prep takes 4-6 hours but saves days of fixes. Readers, how’s your room looking? Even prep turns the idea of painting a house’s interior walls evenly into reality. You’re set for painting!
Choosing the Right Paint and Colours for Your Interior
Picking paint feels overwhelming. As a beginner, focus on the basics for your interior house painting colours journey. Good choices mean durability and that “wow” factor.
First, paint types. Latex (water-based) is beginner gold—easy soap-and-water cleanup and quick dry time. Oil-based? Tougher for cabinets but durable. Stick to latex for walls.
Sheens matter:
- Matte/flat: Hides imperfections, great for adults-only rooms.
- Eggshell: Subtle shine, living rooms.
- Semi-gloss: Kitchens/baths—scrubbable.
Now, colour selection. Use a colour wheel: Blues/greens calm; warm colours like beige energise. Test samples on walls—view in your light (morning vs. night). Apps like Sherwin-Williams’ help virtually.
2026 Trends: Earth tones (terracotta, sage), neutrals for resale. Small rooms? Light shades expand space.
Coverage Calculator: [ \text{Gallons Needed} = \frac{\text{Total Sq Ft}}{350} \times \text{Coats (usually 2)} ] Example: 500 sq ft room = ~3 gallons.
For interior house painting colours in small rooms, pale greys reflect light. Personalise: Match art or furniture. Buy samples first—what colour calls to you? Smart picks make your paint house interior DIY pop.
Step-by-Step Guide: How to Paint a House Interior Like a Pro
Here’s the heart of your beginner house painting guide. Follow these numbered steps for pro results—work top-down: ceilings, walls, trim. Allow dry time between coats. Stir paint well—thin if needed.
Priming Walls
Primer seals surfaces for even colour. Pour into the tray; load a clean roller. Start top-down in 3×3 ft sections. Use “W” or “M” pattern, then roll over lightly. Brush corners first (“cutting in”). One coat for new walls, two for stains. Dry 4 hours. Why bother? It prevents bleeding and boosts coverage. Inspect: Smooth? You’re golden. Cutting In Edges
Precision time. Dip angled brush 1/3; tap off excess. Hold like a pencil. Paint a 2-3-inch border along ceilings, trim, and corners. “W” wiggle for evenness. Steady hand? Practice on cardboard. Pro tip: Load lightly to avoid drips. Takes 30-60 min per room—worth it for sharp lines.
Rolling Walls
Rollers rule walls. Nap up paint halfway; roll off excess on tray ridges. Top-down: Roll “W” in sections, fill with up-down strokes. Overlap wet edges. Avoid “holidays” (missed spots)—back-roll under lights. Direction: With wall texture. Two coats: First builds base, second shines. Smooth? Keep speed consistent. You’ll cover a wall in minutes—feels magical!
Painting Trim and Ceilings
Ceiling first: Use an extension pole and white paint to hide flaws: roll or spray. Trim next: Angled brush for baseboards, doors. Thin coats prevent drips. Sand lightly between if needed.
Second Coat and Dry Time
Wait 2-4 hours (check can). Inspect angled light for misses. Apply the second coat the same way—thinner now. Full dry: 24 hours before moving furniture. Touch baseboards last. Before/after? Transformative. Pat yourself—pro-level how to paint a house interior achieved!
Take breaks; good music helps. How’s your progress? These interior painting tips ensure even, lasting beauty.
Common Mistakes to Avoid When Learning How to Paint a House Interior
Even pros slip up, but you can dodge these in your paint house interior DIY. Spot them early.
- Overloading brushes/rollers: Drips everywhere. Tap off excess—light load wins.
- Skipping primer: Paint peels fast. Always prime porous or dark walls.
- Poor ventilation: Fumes cause headaches. Fans + open windows mandatory.
- Rushing dry times: Sticky mess. Follow labels—patience pays.
- Cheap tape: Bleeds ruin lines. Blue painter’s tape seals best.
- Ignoring direction: rolls uphill, causing streaks. Top-down always.
Quick Fixes List:
- Drips? Wipe immediately, sand, repaint.
- Uneven? Feather edges with a dry roller.
- Bubbles? Sand, prime again
Cleanup, Safety, and Maintenance Tips
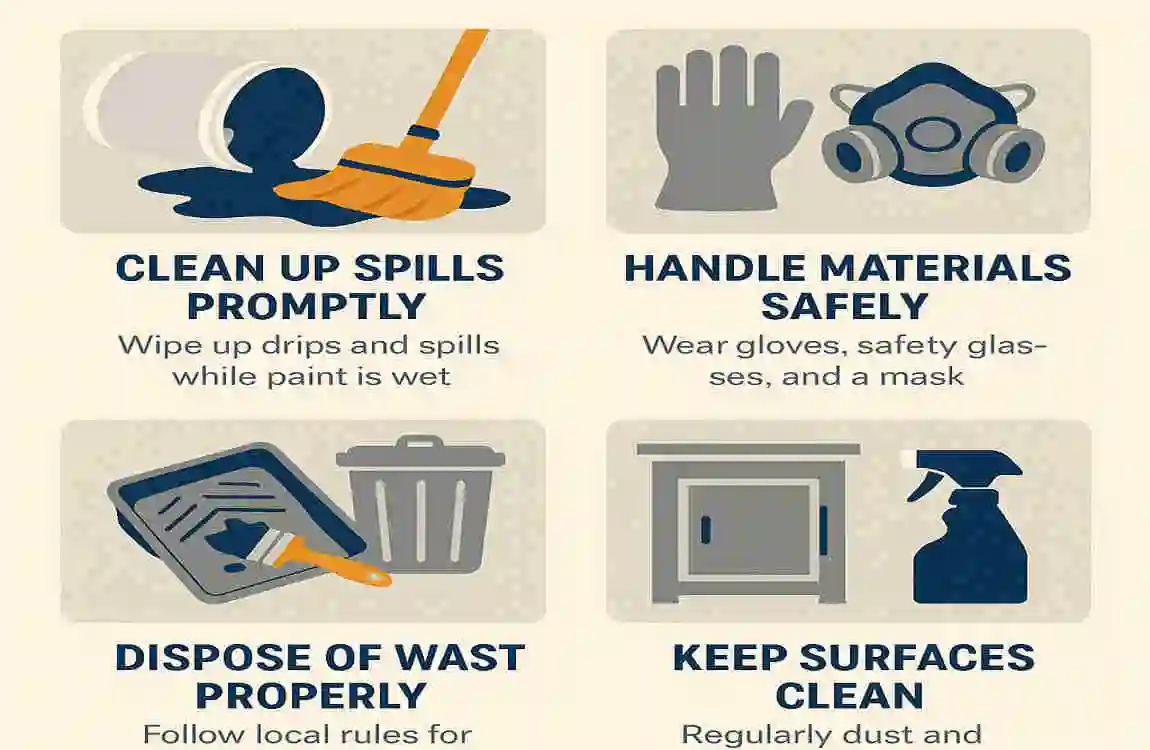
Job done? Cleanup seals success. For latex: Warm soapy water on brushes/rollers—work fast before it dries. Rinse trays; peel liners.
Safety Essentials:
- Goggles, gloves, and a respirator for fumes.
- Stable ladder; never overreach.
- Keep kids/pets out; cover vents.
Maintenance: Touch up scuffs with spare paint yearly. Clean walls with mild soap. Longevity: 5-10 years. Stored paint? Cool, dark spot.