
Did you know that a proper basement window installation can boost your home’s value by 7-10% while slashing energy bills by up to 15%? That’s according to reliable sources like ENERGY STAR and Remodelling Magazine. Imagine transforming that dark, stuffy basement into a bright, inviting space that feels like an extension of your living area. It’s not just about aesthetics—it’s a smart move for safety, comfort, and your wallet.
Why install Basement Windows? Key Benefits
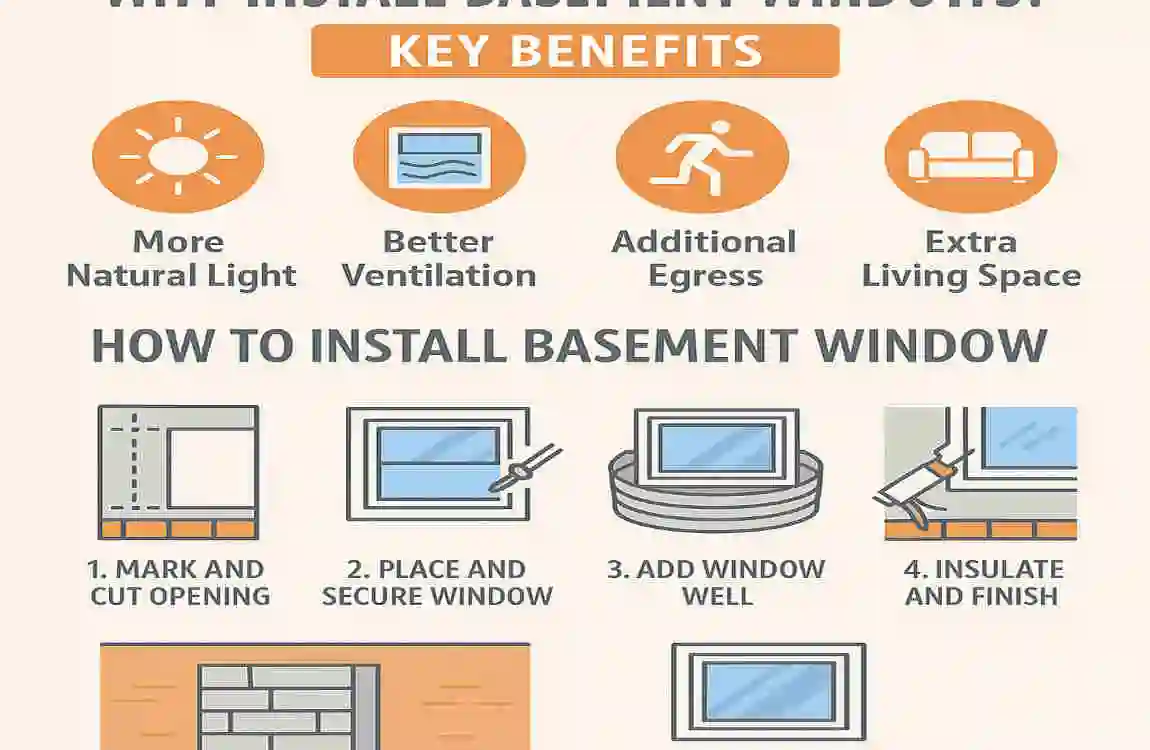
Installing basement windows isn’t just a weekend chore—it’s an investment that pays off in multiple ways. You might be surprised how much a simple upgrade like this can change your home. Let’s break down the key benefits, one by one, so you can see why it’s worth your time and effort.
Boost Natural Light and Mood
Picture this: Your basement, once dim and gloomy, now floods with sunlight. Egress windows can increase natural light by 30-50%, turning “basement blues” into a thing of the past and eliminating the need for harsh artificial lights that make the space feel like a cave.
This extra light isn’t just pretty—it’s good for your health. Studies show that more natural light boosts vitamin D levels, which can improve your mood and even productivity. If you work from home or have kids playing downstairs, this could make a real difference. Imagine feeling energised rather than sluggish down there.
Don’t believe me? Think about how you feel on a sunny day versus a cloudy one. That same principle applies indoors. By choosing the right basement egress windows, you’re essentially inviting the outdoors in, creating a healthier environment for everyone.
Increase Home Safety and Value
Safety first—that’s the motto when it comes to basements. Egress windows are a must for any habitable space, like a bedroom or rec room. According to the International Residential Code (IRC), emergency exits require at least 5.7 square feet of opening. This could save lives in a fire or other disasters.
Beyond safety, these windows add serious value to your home. The 2025 Cost vs. Value Report estimates a 70-80% return on investment. That means if you spend $1,000, you could see $700-800 back when you sell. Appraisers love features that meet codes and enhance appeal.
BenefitImpact
Safety meets fire codes and provides quick escapes
Value adds $5,000-$15,000 to your home’s appraisal
See? It’s not just about compliance; it’s about smart money. If you’re planning to sell soon, this upgrade could tip the scales in your favour. What would you do with that extra equity?
Achieve Energy Savings
Energy bills sneaking up on you? Basement windows can help fight back. Opt for double-pane models with Low-E glass, and you could cut heat loss by 40%. That means warmer winters without cranking the thermostat.
Compare materials: Vinyl windows are budget-friendly and easy to maintain, while fibreglass windows are more durable and 25% more energy-efficient. Styles like casement or hopper allow for better airflow, reducing the need for AC in summer.
Think about your utility statements. With energy costs rising, these savings add up fast—potentially hundreds of dollars a year. It’s like giving your home an efficiency makeover. Have you checked your windows lately? If they’re old and drafty, it’s time for an upgrade.
In short, energy-efficient basement windows aren’t a luxury; they’re a necessity in today’s world. They keep your home comfortable and your bills in check.
Types of Basement Windows: Choose the Right One
Choosing the right basement window can feel overwhelming, but don’t worry—we’ll simplify it. Not all windows are created equal, especially in a basement setting. We’ll explore the options, so you can pick one that fits your needs, budget, and style.
Egress vs. Non-Egress Windows
First things first: What’s the difference? Egress windows are the legal must-haves for basements used as living spaces. They provide an escape route that meets those IRC codes we mentioned earlier. Non-egress ones are smaller and delicate for storage areas, but they won’t cut it for bedrooms.
If your basement is a guest room or home office, go egress all the way. They’re larger, letting in more light and air. Skipping this could mean failing inspections or safety risks. Ask yourself: Is your basement just storage, or do people spend time there?
Popular Materials and Styles
Materials matter a lot down here, where moisture is a constant threat. Vinyl is popular because it’s affordable and low-maintenance—no painting needed. It resists rot and holds up well in damp conditions.
Fibreglass takes it up a notch. It’s super durable and offers better insulation, making it ideal for energy-conscious homeowners. Then there are styles: Casement windows swing open like a door for maximum ventilation. Hopper styles tilt inward, perfect for tight spaces. Sliders glide side to side, great for wide openings.
Consider your basement‘s layout. A slider might work if you have a long wall, while a hopper suits more minor spots. Mix and match based on what feels right for your home.
To help you decide, here’s a comparison table:
TypeCost (per window)Energy RatingBest For
Vinyl Hopper $300-600 Good Budget installs in moist areas
Fibreglass Casement $500-900 Excellent High-traffic basements needing durability
Slider $400-700 Fair Wide openings for easy access
This table breaks it down. Vinyl might save you money upfront, but fibreglass could pay off in energy savings over time. Which one speaks to you?
Tools and Materials Needed for Basement Window Installation
Before you dive into how to install basement windows, gather your gear. Having the right tools and materials makes the job smoother and safer. We’ll list them out clearly, so you can check off what you need.
Essential Tools
Start with the basics to avoid mid-project trips to the store. You’ll need a drill for holes, a sawzall for cutting through tough materials, and a level to ensure everything’s straight. Don’t forget a caulk gun for sealing and safety gear like goggles and gloves to protect yourself.
Pro tip: If you’re dealing with concrete, rent a diamond-tip hole saw. It cuts cleanly without cracking the foundation. These tools aren’t fancy, but they get the job done right.
- Drill and bits for precise holes.
- A sawzall or a reciprocating saw for removing old frames.
- Level and tape measure for accuracy.
- Caulk gun and utility knife for finishing touches.
- Safety gear: Goggles, gloves, and a dust mask.
Materials Checklist
Now for the supplies. Think of this as your shopping list—print it out or save it as a checklist.
- Replacement window kit, sized to your opening.
- Flashing tape to prevent water leaks.
- Shims for levelling the window.
- Expanding foam for insulation.
- Waterproof membrane to protect against moisture.
With these, you’re set. Remember, quality materials last longer, so don’t skimp.
Preparation Steps Before Installing Basement Windows
Preparation is key to a successful installation. Rushing in can lead to costly mistakes, so take your time here. We’ll guide you through assessing, checking legal stuff, and budgeting.
Assess Your Basement
Begin by examining your space. Is your foundation poured concrete or cinder block? This affects how you cut and install. Measure the opening precisely—width, height, and rough opening size. A mismatch means headaches later.
Walk around and note any cracks or signs of water. Suppose it’s damp, address that first. You want a solid base for your new window.
Legal and Safety Checks
Don’t skip the paperwork. Permits are required in about 90% of U.S. cities—check your local building codes to avoid fines. Also, waterproofing test: pour water outside and see if it seeps in.
Safety-wise, ensure the area is clear of hazards. If you’re unsure, consult a pro. Better safe than sorry, right?
Budget Breakdown
Money talks, so let’s crunch numbers. DIY is cheaper, but pros bring expertise.
ItemDIY CostPro Cost
Window $400 $400
Tools/Labour $100 $800
Total (per window) $500 $1,200
This table shows the basics. Factor in extras like permits, and adjust for your area.
Step-by-Step Guide: How to install Basement Windows
Here’s the heart of it: A detailed, step-by-step guide on how to install basement egress windows yourself. We’ll break it into manageable parts with tips along the way. Grab your tools, and let’s do this. Remember, safety first—wear protection and work with a buddy if possible.
Remove Old Window
Start by clearing the area. Score the old sealant with a utility knife to loosen it. Then, use your sawzall to break through any mortar or framing holding the window in place.
Carefully extract the frame, piece by piece. Watch for sharp edges—goggles are a must. If it’s stuck, gently pry with a crowbar. This step might take 30-45 minutes, but patience pays off.
Once removed, inspect the opening for damage. Clean out debris with a shop vac. You’re creating a fresh canvas for the new window.
Prepare the Opening
Now, clean thoroughly. Remove any old caulk or insulation. Use a level to check if the opening is square—if not, you might need to adjust with shims later.
Install a sill pan at the bottom for proper drainage. This sloped piece directs water away, preventing leaks. It’s a small step but crucial for longevity.
Measure again to confirm fit. Double-check everything; accuracy here saves time down the line.
Test Fit and Waterproof
Dry-fit your new window. Slide it in without securing to see how it sits. Make adjustments if it’s off.
Apply flashing tape around the edges. This waterproof barrier keeps moisture out. Start at the bottom and work up, overlapping seams for full coverage.
Step back and admire—it’s starting to look like a real upgrade. This prep ensures your window stays dry and functional for years.
install the New Window
Time to secure it. Place shims under the window to level it—check with your level on all sides. Once plumb, screw it into place through the frame.
For egress windows, ensure the opening mechanism works smoothly. Test the swing or slide now, before sealing.
If it’s a casement style, attach the hinges firmly. Take your time; rushing can lead to crooked installs. Photos of before and after can help you track progress.
Seal and Insulate
Fill gaps with expanding foam—it’s like insulation in a can. Let it cure, then trim excess.
Caulk the exterior edges for a watertight seal. Use exterior-grade caulk that matches your home’s look.
Finally, add any trim or finishing touches. Step back—your basement just got a whole lot brighter.
Pro Tip: Avoid common mistakes, such as poor sealing, which can cause leaks. If in doubt, consider our free consultation for expert advice.
This whole process takes 2-4 hours per window for DIYers. With practice, you’ll get faster.
Common Mistakes to Avoid in Basement Window Installation
Even pros slip up sometimes, but you can learn from them. Here’s a list of pitfalls to dodge:
- Skipping permits: Fines can hit $1,000 or more—always check local rules.
- Ignoring slope: Without proper drainage, water can pool, causing damage.
- Using cheap materials: They might fail in 5 years, costing you twice as much.
- Forgetting insulation: Drafts lead to higher energy bills.
- Not measuring twice: A wrong fit means starting over.
Avoid these, and your project will shine. Ever made a home improvement mistake? Share in the comments—we’ve all been there.
When to Call a Professional for Basement Window Installation
DIY is great, but some jobs need expert hands. If you spot structural issues like cracks in the foundation or tricky block walls, call in the pros. They handle complexities you might miss.
Red flags include electrical wiring near the opening or severe moisture problems. Pros also offer warranties—think 20 years of peace of mind.
Our team specialises in this. We guarantee seamless installs with energy-efficient options. Ready for help? Schedule a free quote today—it’s easy and obligation-free.
Maintenance Tips for Long-Lasting Basement Windows
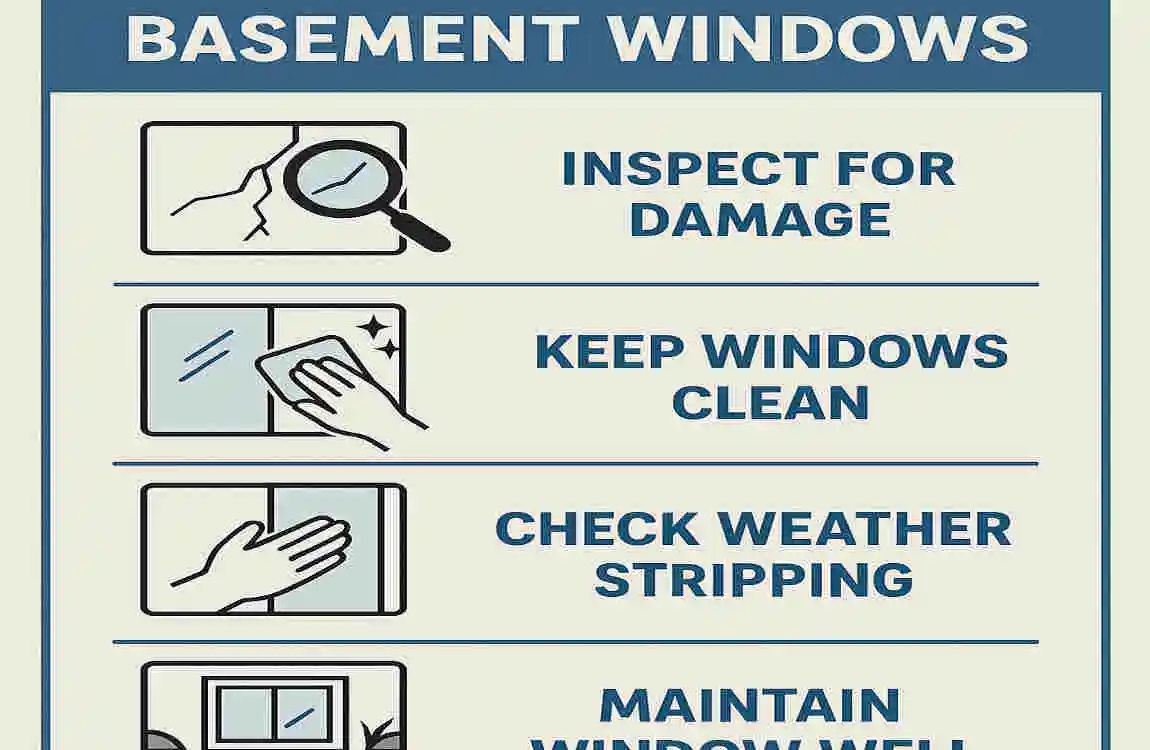
Once installed, keep them performing. Clean the glass and tracks quarterly with mild soap—no harsh chemicals.
Inspect seals annually for cracks; reseal as needed. For extra savings, add storm panels in winter to block cold drafts.
Simple habits like these extend the life of your windows. Your basement will stay bright and efficient for decades.